Tag Archives: useful tools

Tuesday’s Tool: Mrs. Anderson’s Baking Pie Shield


MrsAPieShield

When Life Gives you Apples, Pears and Peaches, Make Pie!

Whichever kind of pie you’re baking, the Mrs. Anderson’s Baking Pie Shield is sure to be one of your favorite pie-baking tools. The new and improved Mrs. Anderson’s Pie Shield fits 9.5-inch and 10-inch pie plates, including those with fluted edges (such as our own Easy as Pie Pie Plate). Simply place the shield over the pie before baking, and the shield keeps crusts from over browning, allowing the pie to rise in the middle while reducing spillage.

Tuesday’s Tool: The Original JarPop JarKey

JarKeyColors

The Original JarPop JarKey by Brix, one of HIC, Harold Import Co.’s brands, was recently chosen as a recommended pick by Cook’s Illustrated, receiving three stars for comfort, and three stars for ease of opening. The review, which appeared in the July/August 2015 issue, involved testing of seven jar openers on jars of all shapes, sizes, and materials to find the best all around pick. To read the Jar Openers review in the July/August 2015 issue, visit Cook’s Illustrated online.

JarKeyJarKey is often referred to as the World’s Easiest Jar Opener due to its patented design that fits all traditional preserving jars. It quickly and effortlessly pops the vacuum seal, making it easy to open the lid with no twisting or gripping. The unique design features a special three-point principle that ensures the vacuum is released, allowing for a gentle lift without damaging the lid. It is made of high density ABS plastic and has has no sharp edges or points or moveable parts. Fits all traditional preserving jars. Available in an array of fun colors, included frosted.

Cook’s Illustrated/America’s Test Kitchen (ATK) is constantly in search of products that offer the best value and performance. As part of their testing process, ATK strives to figure out why one product is better than another, and to explain that reason to its readers. Because they accept no advertising, Cook’s Illustrated provides completely unbiased, no-nonsense product reviews.

In the near future, Christopher Kimball, founder, America’s Test Kitchen, will appear on the The Rachael Ray Show talking about his favorite gadgets, including the JarKey. Air date is yet to be released.

For more information on the Original JarPo JarKey by Brix, contact Laura Everage Leverage@haroldimport.com, 415-306-4546

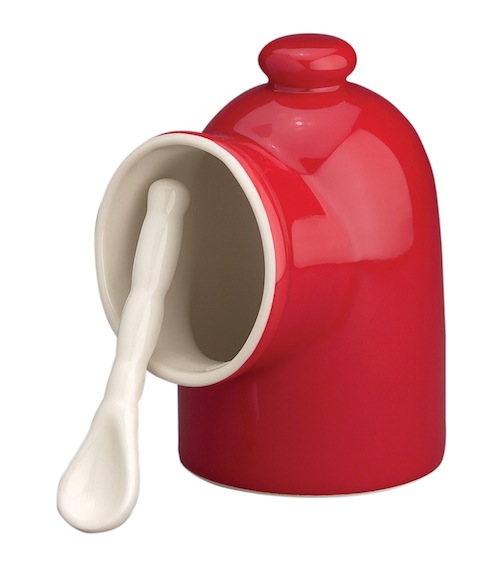
Tuesday’s Tool: The Salt Cellar

SaltCellar

Salt has been used in pickling and preserving foods for thousands of years. But before there was the salt shaker, there was the salt cellar. In fact, the salt cellar appeared in paintings of medieval feast tables and has served as a status symbol throughout the ages.

The salt cellar allows the salt to breathe, enhancing the  quality and taste of the salt.  At the same time, it is designed to hold and help prevent moisture from causing the salt to cake.

The HIC Salt Cellar with Spoon is part of HIC’s broad collection of porcelain dinnerware. The Salt Cellar will keep your most often used salt near at hand and safe from dust and debris. Decorative and functional, this kitchen utensil features a red exterior and a white interior and is designed with  a large “snout” so you can easily get to your salt. The small knob makes for easy transport.

Keep the HIC Salt Cellar near your stovetop and you’ll no longer worry about contaminating your most often used cooking aid – salt. Made of fine porcelain so it’s extremely durable. Take it with you, wherever you want and need it — at the stove, dinner table, or out at the grill.

Oven, microwave, freezer and dishwasher safe. Measures 4 X 3”.


Spiral Slicing

HICSpiralSlicer

Spiral Slicing is more than a fad, it is a movement that has been embraced by a wide range of consumers from those who desire to limit their carb or meat consumption while increasing their vegetable intake, to consumers who simply want to prepare and serve the same old fruits and veggies in a different way.

There is no shortage of new cookbooks supporting this movement, all dedicated to offering a multitude of different recipes using spiral-sliced fruits and veggies.

HIC, Harold Import Co. has just the right tools to support this culinary movement, and our Lightening Deal is designed to support our customers’ in-store efforts to provide consumers with quality products at the best possible price.

The handy HIC Spiral Slicer is a quick and easy way to create endless julienne strips with just a simple turn. Perfect for use on firm vegetables such as carrots, zucchini, turnip, rutabaga, large radishes and more, the double-sided slicers let the user choose from two different Julienne slices – small (2mm-3mm) or large (3.5mm-5mm). The high-quality Japanese stainless steel blades maintain a super sharp edge for precise slicing time and again. The body is constructed of food-safe plastic and is designed with a comfortable, slip-free hold for maximum ease of use and safety while slicing.

Garlic Press Test from the Brooklyn Homemaker

Garlic Press Test with the Brooklyn Homemaker

Garlic Press Test with the Brooklyn Homemaker

Have you met Tux? He’s the author of a fabulous blog called Brooklyn Homemaker, coming in 4th place in the “Homies” blog awards! HUGE! He shares recipes, stories, and gives in-depth reviews of gadgets too.
In his latest post, Tux de-bunks the garlic press, putting models of all price points to the test.

Read the full post here.

We want to thank the Brooklyn Homemaker for including Fante’s Cousin Umberto’s Garlic Press, made by Harold Import Co., in this line-up of fine garlic presses. We are honored and humbled to be a part of your consideration set.

Want to find a Fante’s Cousin Umberto’s Garlic Press of your own? Check out Whisk of Brooklyn and Manhattan. Also found in fine kitchen shops nation wide.

Cacao, Almond Milk, and Banana Ice Cream – A Rich Chocolate Summer Delight

Cacao, Almond Milk, and Banana Ice Cream

Cacao, Almond Milk, and Banana Ice Cream

With summer in full swing, a cool treat is always appreciated. We explored venturing beyond our traditional ice cream recipes, and pulled in a few nutritious ingredients to make this rich, chocolatey cacao, almond milk, and banana ice cream.

Cacao Ice Cream Recipe

Cacao Ice Cream Recipe

Cacao, Raw Almond Milk, and Banana Ice Cream Recipe 

Cacao Powder

Cacao Powder

This recipe produces an “ice cream” with an incredibly rich, dark chocolate flavor imparted by the cacao powder, and has a creamy mouthfeel from the homemade almond milk. (You could use store bought almond milk, but the flavor and texture will be a little different.)

Any sweetener of choice can be used in this recipe, but we found that honey and agave nectar both pair well with the rich tasting cacao.

This ice cream was made using a blender and frozen bananas, which is great if you want to get this dessert on the table quickly. If you have an ice cream maker you could first blend all ingredients at room temperature, then  transfer to an ice cream maker to freeze.

Cacao Powder

Cacao Powder

Ingredients:

  • 2 heaping Tbsp Cacao Powder
  • 2 Tbsp Raw Honey or Agave Nectar (or stevia for the sugar sensitive)
  • 1/3 cup cold Homemade Almond Milk using raw almonds (see our recipe here)
  • 2 large frozen bananas (break in 1-inch pieces before freezing)

Tools:

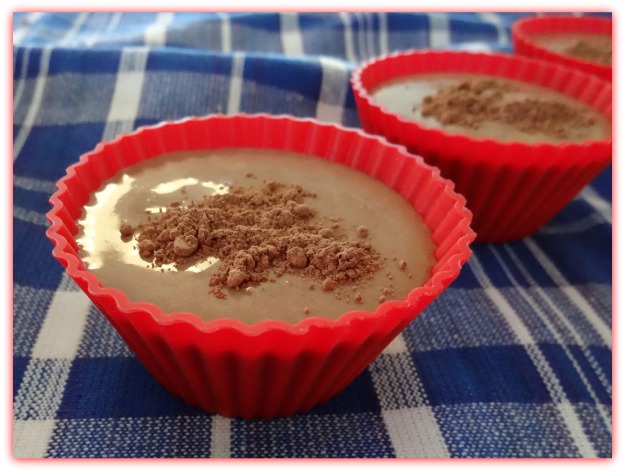
Mrs. Anderson's Baking Silicone Baking Cups and Royal Blue Box Plaid Kitchen Towel

Mrs. Anderson’s Baking Silicone Baking Cups and Royal Blue Box Plaid Kitchen Towel Available from HIC

Place almond milk, cacao powder, and honey or agave in blender and pulse to start mixing slowly. Turning on high power without slowly mixing the cacao powder into the liquid first can cause it to shoot upwards in a cloud of cocoa dust. After almond milk, cacao powder, and honey are mixed gently, increase speed for a few seconds and mix well. Add frozen banana pieces, and pulse to get them moving. Then blend on high until the banana chunks smooth out and an ice cream consistency results. Serve at once, and sprinkle with additional cacao powder if desired. The deep chocolate taste is downright decadent.

*Hot weather tip: If you’re in an especially warm climate, or warm kitchen, ice cream can start to melt quickly after served. Try pouring into chilled ice cream cups (store them in the freezer) to help keep ice cream from melting quickly.

We appreciate our readers, and are interested in hearing more about your culinary adventures. Drop us a line and share what you’re experiencing! We’d love to hear your thoughts, anytime the mood strikes you. 

Contributed by Nicole Herman, of HIC.

Cannonball Ice Ball Tray Does Double Duty – Makes Perfect Round Ice Cubes and Delicious Cake Bites

HIC's Cocktail Ice Ball Tray

HIC’s Cannonball Ice Ball Tray

HIC, Harold Import Co.’s very own Cannonball Ice Ball Tray, previously known as the Cocktail Ice Ball Tray, was created to take care of the need for an ice cube that will dissolve more slowly, leaving your cocktail or any beverage, chilled but not diluted.  Not only does it achieve this goal, but makes a perfect cake pop or cake bite as well! We will show you how to make them step-by-step, below. The size of each cube – 1.5 inches in diameter, means you can use just one in a rocks or cocktail glass, or add many of these frozen spheres when filling an ice tea pitcher or large glass. The larger the piece of solid ice, the slower it will melt into your drink. To get yours, visit Fante’s Kitchen Shop. Coming soon, to fine kitchen retailers nationwide.

To make ice balls or spheres in the Cocktail Cannonball Ice Ball Tray: Fill the bottom portion (you can tell which is the top, because it has small pin holes to allow air to escape) with water, until it’s exactly halfway up to the top edge of the tray.

Cocktail Ice Ball Tray Fill Level for Making Spheres Shaped Ice Cubes

Cocktail Ice Ball Tray Fill Level for Making Spheres Shaped Ice Cubes

Press the top of the mold down until it fits snuggly against the base. Freeze.

Cocktail Ice Ball Tray Fully Filled and Closed, Ready for Freezing

Cocktail Ice Ball Tray Fully Filled and Closed, Ready for Freezing

To remove, run warm water over the outside of the mold for a few seconds. This melts any ice that could have formed between the ice cubes or spheres, so they can each pop out of the mold easily. Now, set the mold down, right side up, and pull the top half off the bottom. The cubes will be sitting in the bottom half of the mold, and will release easily.

Releasing the Sphere Shaped Ice Cubes from the Cocktail Ice Ball Tray

Releasing the Sphere Shaped Ice Cubes from the Cocktail Ice Ball Tray

Removing the Sphere Shaped Ice Cubes

Removing the Sphere Shaped Ice Cubes

Berry Infused Ice Balls Made With HIC's Cocktail Ice Ball Tray

Berry Infused Ice Balls Made With HIC’s Cocktail Ice Ball Tray

Creating berry filled ice balls to slowly infuse your drink with berry flavor is another way to use HIC’s Cannonball Ice Ball Tray. Simply crush fresh or previously frozen berries, such as blueberries, raspberries (shown here) or strawberries, and fill each each round in the bottom half of the tray with the crushed berries, heaping full. Crushing the berries and stuffing and filling each round until heaping full is important, so that the berry mixture is not completely sealed in a thick layer of ice, and will be able to make contact with your drink to allow infusion. Next, add water, and fill the bottom half of the tray until it’s exactly halfway up to the top edge of the tray (as illustrated above). Press the top of the mold down until it fits snuggly against the base. Freeze. Remove ice balls as illustrated above, and place in a glass of fresh water, tea, or juice. It will take a few minutes for the thin ice just covering the outer edges of the berry mixture to start to melt, and reveal the berry beneath. The berry juices will tint your beverage a lovely bright hue, as pictured, and add a subtle berry flavor.

The Cannonball Ice Ball Tray is made of silicone, measures 9.25″ x 3.75″ dishwasher safe, and heat safe up to 500 degrees.

Making Cake Bites or Cake Pops with the Cannonball Ice Ball Tray

Spice Cake Bites Dusted in Powdered Sugar made in HIC's Cocktail Ice Ball Tray

Spice Cake Bites Dusted in Powdered Sugar made in HIC’s Cocktail Ice Ball Tray

The Cannonball Ice Ball Tray serves double duty, not only to make ice balls or spheres, but also works brilliantly for cake bites or cake pops! Below we’ll share a really moist spice and pumpkin cake recipe, as well as a step-by-step guide to making cake bites in the HIC Cannonball Ice Ball Tray.

Spice and Pumpkin Cake Bites Recipe

Ingredients (Dry):

1/2 cup unsalted butter
2 1/4 cups all-purpose flour
2 teaspoons baking soda
1/4 teaspoon salt
Spices: 2 teaspoons cinnamon, 3/4 teaspoon ginger, 1/2 teaspoon nutmeg, and 1/4 teaspoon cloves)

(Wet)
1 whole large egg plus 2 yolks
1 1/2 cups sugar
¼ cup sour cream
1 can (15 ounces) pumpkin puree (not pumpkin pie filling)

Powdered Sugar for dusting

Mix flour, baking soda, salt, and spices. In a separate bowl, mix eggs (room temperature!) sugar, softened butter, sour cream, and pumpkin puree. Gently fold dry ingredients into wet.

How to achieve a super moist cake? Baking maven Rose Levy Beranbaum offers a wonderful tutorial.

Preheat oven to 325, and set the oven rack in the center of the oven.

Using the Cannonball Ice Ball Tray to make the cake bites:

Lightly butter the insides of the rounds of both halves of the tray. Try putting a little butter on a piece of a paper towel and rub the butter into the rounds. It might sound a odd, but doing it this way enables an even and light coating. To see how they would turn out differently, some of the cups in the tray were coated with butter and some with non-stick baking spray. Both popped out of the form equally well after baking.

Use a tablespoon to fill each round in the bottom piece of the mold precisely. You can tell which is the bottom, because it doesn’t have pinholes. The half with the pinholes will be placed on top, and the holes allow for steam or extra batter if overfilled, to escape during baking. Heap the tablespoon with batter, and then fill each hole flush. Go back to the mixing bowl with the spoon to get a bit more batter, and top off each hole so they are overfilled to the point of mounding about ¼ inch above flush, but not so much that it spreads onto the surrounding flat part of the silicone tray.

Press the top half of the mold down onto the bottom half, and squeeze the two together so they fit snugly. Place on a cookie sheet, and bake for 14 minutes. Remove from oven and let the mold sit unopened, cooling, for another 10 minutes.

Removing Cake Bites from the Cocktail Ice Ball Tray
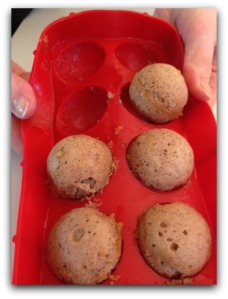
Removing Cake Bites from the Cocktail Ice Ball Tray

Removing Cake Bites

Removing Cake Bites

To remove the cake bites, slowly pull the top half of the mold up off the bottom half. Use your finger to gently press down on the top of each peak in the mold, to release the cake bite if it seems hesitant to release. We found we needed to do this on a few, but others released on their own.

Once the top half of the mold is lifted off, hold the bottom half of the mold in your hands, and pop the cake bites out by pressing up on the bottom of each round to release them. Because these are made of cake batter, and not cake batter mixed with frosting as traditional cake pops are, they are softer and a bit more delicate (especially when still warm) so handle gently.

If you find a ridge around the circumference of the cake bite where the mold halves meet, it can be scraped off with a paring knife.

Baked Spice Cake Bites

Baked Spice Cake Bites

You can decorate with frosting, glazes, sprinkles, or simple powdered sugar. To achieve the look of the cake bites shown in this post, sprinkle powered sugar on a plate and roll still barely warm cake bites in the sugar until coated, and serve.

Dusting Spice Cake Bites in Powdered Sugar

Dusting Spice Cake Bites in Powdered Sugar

Spice Cake Bites Dusted in Powdered Sugar made in HIC's Cocktail Ice Ball Tray

Spice Cake Bites Dusted in Powdered Sugar made in HIC’s Cocktail Ice Ball Tray

Enjoy!

To clean the Cannonball Ice Ball Tray, wash in warm soapy water or pop in the dishwasher.

Article Contributed by Nicole H., of HIC

Cheese Spaetzle Recipe and Spaetzle Maker or “Hobel” Tips

Cheese Spaetzle or käsespätzle

Cheese Spaetzle or käsespätzle

Spätzle, as my Grandma Esther would spell it, loosely means “little sparrow” and gets it’s name from a time before kitchen tools like spaetzle makers, or “hobels” as they’re also known, were readily available. Historically it was shaped by hand with a spoon or knife and was thought to resemble small birds. Spaetzle is the base of many dishes in a cookbook my Grandma presented to me on my 16th birthday; A fantastic compilation of family photographs spanning 5 generations, rustic recipes laden with meat and starchy vegetables meant to feed a large farming family, ingredient lists calling for everything from goat’s milk to “Aunt Edna’s canned pears,” plenty of spaetzle, and clippings from newspapers and magazines that had significance to my Grandmother either culinary or personal. This book is a time capsule and I smile every time I go through it.

Spaetzle is traditionally used as a base for both sweet and savory dishes, soups, and one-dish meals, as it is in my family cookbook. It’s inexpensive, filling, and can be modified to please a variety of palates. I’ve attempted every recipe in Grandma’s cookbook including spaetzle with cherry sauce made with Grandma next to me, others like squash pie made along side my dad, and the one I’m sharing here – Käse or Light Cheese Spaetzle – I make for my family. Grandma Esther left a sweet message in the book, noting, “Dear Nee Nee, some of the dishes may not be so practical for modern times (Maybe she was thinking of the kidney pie? My ancestors didn’t waste a bit.) I hope you find a few that you can enjoy.” And I have. The flavor and texture of spaetzle is comforting, and brings warm feelings of nostalgia. It’s quick to whip together for guests, plus one batch of noodles can be topped a variety of ways to suit everyone around the table. I hope you might enjoy it too.

Grandma Esther’s käsespätzle or Spaetzle with Cheese Recipe

Spaetzle Ingredients

Spaetzle Ingredients

Spaetzle Ingredients (Makes 2 servings; Modified from original which served 10)

1/2 cup whole wheat flour (this imparts a nuttier, heartier texture)
1/2 cup plus 2 tablespoons all-purpose flour
1 teaspoon salt
1 teaspoon ground pepper
2 large eggs
1/4 cup milk

Spaetzle Dressing:
2 pats butter
½ cup grated cheese (my Grandmother used Emmentaler, a harder German cheese) Here is a great website with a guide to German cheeses, for your perusal.
Additional salt and pepper to season

Tools: Spaetzle Maker or Hobel. Visit HIC’s “Where to Buy” page to find one at a kitchen shop near you.

Directions:

Combine the flour, salt and pepper.

Dry Spaetzle Ingredients

Dry Spaetzle Ingredients

Wet Spaetzle Ingredients

Wet Spaetzle Ingredients

In a second bowl, whisk the eggs and then add in the milk.

Create a depression in the center of the flour mixture and pour in the wet ingredients. The flour should be added and blended gently and slowly, scraping from the sides of the bowl, until well combined.

Wet and Dry Spaetzle ingredients

Blend dry ingredients slowly into wet spaetzle ingredients

The dough should be thick but not ridged, like a stiff muffin batter. I find the dough is easiest to work with, when I refrigerate for 10 minutes before placing in the spaetzle maker or “Hobel.”

Bring a pot of lightly salted water to a boil, and then reduce to a simmer. Make sure the pot is wide enough to allow for the spaetzle maker to sit on top, if using this device. Place the spaetzle maker over the pot, and clip to one edge.

Spaetzle maker clipping to 4 quart pot

Spaetzle maker clipping to 4 quart pot

Fill the hopper with a ball of dough, filling it to the top. Slide the hopper across, and watch the dough fall through the holes, into the simmering pot below!

Moving dough through spaetzle maker

Moving dough through spaetzle maker

Do this in batches so you don’t get a thick layer of spaetzle accumulating, which can clump together. With this size recipe, and using a 4 quart pot, I found I don’t have to do batches, I can make all the spaetzle at once and there’s enough surface area on the top of the pot to deter clumping. This dough recipe fills the hoper of the spaetzle maker exactly once. You know the spaetzle is done, when it floats to the surface of the pot.

floating spaetzle

floating spaetzle

Stir it gently to prevent it from sticking. Remove the finished spaetzle noodles form the pot with a slotted spoon or dump the whole pot into a smooth surface colander (not a mesh strainer, I find it sticks to the mesh) and give it a light rinse of cold water.

Place the rinsed spaetzle into a bowl with sides high enough to permit tossing, and drop the 2 pats of butter on top. The heat of the spaetzle will melt the butter. Stir in. Sprinkle the cheese into the bowl as well, and stir to combine with the buttered spaetzle. Dish into smaller bowls, and add a little more salt and pepper to taste, if desired. (Or, more cheese on top.) Dig in!

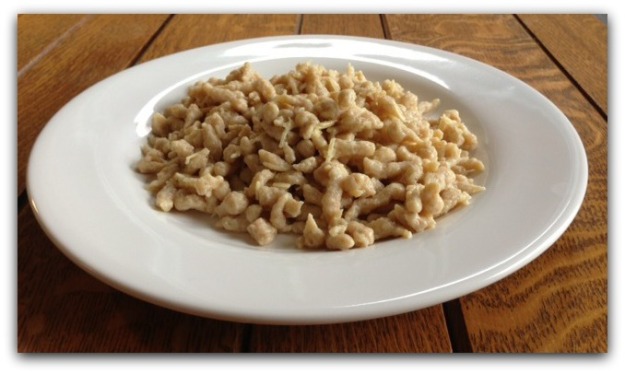
Cheese Spaetzle

Cheese Spaetzle

Article Contributed by Nicole H., of HIC

The Pleasures of the Pomegranate and an Investigation of The Pomegranate Tool

Pomegranate Seeds
One of the first cultivated fruits, the pomegranate offers a unique, sweet-sour taste that is ideal for nibbling on alone or incorporating into cooling drinks, vegetable salads, tart stews, soups and desserts.

The pomegranate boasts high levels of antioxidants in the form of polyphenols, tannins and anthocyanins, all designed to help you stay healthy and strong by fighting those free radicals that can cause certain diseases – and premature aging.

But, getting to the heart of the pomegranate and those tiny seeds (called arils), which are the key to those antioxidants, can be a bit frustrating. The arils, which are surrounded by a shiny, tough, white membrane, can be hard to remove — and often quite messy, Working ones way though the ruby juice and seeds can be an act of devotion – an act that might cause one to throw up their hands and give up. But don’t give up on the delicious taste, versatility, and healthfulness of the pomegranate just because you think it is too much work.

It is often suggested to submerge a halved pomegranate in water in order to more easily remove the arils, and more importantly,  prevent splatter of the ruby red juices. But, I find this still a bit messy and also a bit cumbersome.

The new Pomegranate Tool is a quick, clean and easy way to remove those sometimes stubborn arils.

Here’s how it works: To start off, roll the pomegranate on the work surface to loosen and soften the fruit. Then remove the crown and cut the fruit in half. Place the halved pomegranate  face down in the grid, and cover it with the flexible dome, holding the dome tightly against the bowl.

Pomegranate Tool Pom Face Down

Winner of the Fruit Logistica Innovation Award

Pomegranate Tool Cover onPomegranate Tool With Spoon

To remove the seeds, strike the dome firmly, using a heavy spoon. (The arils will be deposited into the bowl beneath.) If any of the membrane breaks free, it can be easily picked out from the bowl of arils.

Pomegranate De-SeededPomegranate Arils

If desired, rinse the seeds first, and then enjoy.

The three-piece set, which includes the dome, grid and bowl, is easy to clean by hand or in the dishwasher.

Pomegranates are typically available in the fall and early winter. For maximum flavor, look for fruits that are rich in color and are heavy, as they will hold more juice. If, when pressed, powdery cloud puffs emerge from the crown, the fruit is most likely dry. You probably will eat them immediately, but if you must store them, keep them whole in the refrigerator for up to three months. The seeds, when stored in an airtight container in the freezer, can also be kept for three months. Find a Pomegranate Tool to take home, here.

See The Pomegranate Tool demonstration from the HIC booth, at the International Home + Housewares Show.

Versatile and Tasty These little gems are great on their own as a snack, tasty when added to yogurt or granola, and a sweet addition on top of ice cream or salads. They add texture, color and a burst of flavor to just about anything you add them to.

Here are a few suggestions on how to enjoy pomegranates:

  • Add some pomegranate juice to maple syrup
  • Add the arils to squash risotto
  • Reduce balsamic vinegar, spike it with a few tablespoons of  pomegranate juice and then drizzle over salmon
  • Create a sweet salsa with jalapeno, yellow pepper, rice vinegar and the pomegranate arils
  • Design a few ‘adult’ beverages including a Pomegranate Caipirinha or Pomegranate Cosmo
  • Incorporate the arils and juice into a delicious Pomegranate Yogurt Dip
  • Add a bit of acidity to a meat or fowl sauce

Once you’ve started eating them, it’s hard to get out of the pomegranate habit. And, the Pomegranate Tool is a handy way to help you enjoy all the flavor and goodness without the struggle.

Laura Everage is a writer, editor, swimmer, yoga-lover, wife, and mother of four. Her days start very early in the morning, but thanks to her favorite beverage, coffee, she is able to start each day on a good note. Laura began her journey in all things food and beverage related nearly 20 years ago, as Managing Editor of The Gourmet Retailer. She continues to write about food, coffee, tea and kitchenware and is currently working on a book entitled Courage in a Cup: Women, Coffee and the Global Economy. Laura is also founder and editor of her own website, Family Eats, and is editorial director/partner of Coffee Universe. Her work has appeared in a variety of trade magazines as well as consumer publications Saveur and Consumers’ Digest. Laura’s knowledge of the industry has landed her appearances on both the Food Network and Fine Living Network. To contact Laura, email Laura@familyeats.net.