Tag Archives: Sweets

Oven to Table Bakeware: Sweet & Savory Served with Simplicity and Style

Oven To Table Serveware Filled with Sweet and Savory Delights

Oven To Table Bakeware Filled with Sweet and Savory Delights

The kitchen can be a hectic place, which is why I always turn to my favorite tools and cookware to help me get through the process. A key part of my collection is finding multipurpose items that not only save on the space (I’ve a small kitchen), save on time (I’m crunched for time), and add a bit of style to meal service (Why not impress the family with presentation, too?)

When most of us think of multifunctional kitchenware, we think of those small appliances that come with a plug. I use my food processor for everything from chopping vegetables to making dough. I use my electric pressure cooker for sautéing veggies, pressure-cooking beans and for making soup. I use my slow cooker for roasts, casseroles, and keeping mulled wine at perfect temperature for a party. And my professional-grade blender serves up everything from smoothies to freshly ground spices.

But, beyond the multifunctional electric appliances, my kitchen is filled with a few essential pieces of cookware and bakeware. In particular, one of my favorites is my oven-to-table ware — a white, porcelain, fluted baker.

Yes, it’s a basic baker, no bells and whistles, but it’s utility outshines many of my high-end plugged-in tools in the kitchen. The reason is simple: It cooks just about everything, saves me time, and is pretty stylish too.

One of the main benefits of using oven-to-table ware is its utility. One dish goes from freezer to fridge, and from oven (or microwave) to the table. Perfect for use all year round, these pieces are particularly handy during the holiday season, and  are ideal for everything from breakfast, lunch and dinner (Chicken Pot Pie), to appetizers, side dishes (Corn Bread, Wild Mushroom and Pecan Stuffing) and desserts (Parisian Apple Crisp).

My oven-to-table ware is perfect for hectic evenings, casual or formal parties, or for delicious appetizers for game-time. I often pre-make meals, and store them in the freezer until ready to use. If, by chance, there are leftovers, I slip the baker in the fridge, until we’re ready to eat again – when I reheat in the same piece, in either the oven or the microwave.

Another coveted benefit of using my oven-to-table ware is the idea of having fewer dishes to clean. One pot, from freezer to oven to table – is a welcomed choice especially in our home (we don’t have a dishwasher!) Made to last a lifetime, the porcelain oven to table bakers are easily cleaned by hand with soap and water, or in the dishwasher.

Oven-to-table ware comes in all shapes and sizes. It’s best to have several different sizes on hand – some can be single serve, others big enough for a party, and still others sized perfectly for those family one-pot meals.

As for styling, I opt for a classic white. Sure, matching patterned pieces are fun to have, but the classic white glaze with its decorative fluted edges takes me through the seasons, and looks great whenever, or wherever, I use it –  from casual everyday occasions to the formal dinner parties.

Here is one of my favorite meals to make in my oven-to-table baker: (you can find HIC’s Oven-To-Table Fine Porcelain Fluted Baker here)

Polenta Pie

An easy deep-dish pizza with a thick and crunchy cornmeal crust. It takes a total of 1 ¼ hours to prepare, most of which is the crust-baking time. The recipe yields 1, 10-inch pie, which serves four. We like to substitute our favorite vegetables, or those we have currently available. Also, at times we skip the tomato slices and add a bit of tomato sauce instead.

Polenta Pie in Oven to Table Bakeware from HIC

Polenta Pie in Oven to Table Bakeware from HIC

Crust:

  • 1 ½ cups coarse cornmeal
  • 1 tsp salt
  • 1 ½ cups cold water
  • 2 cups boiling water
  • a little olive oil

Filling:

  • 1 tbsp olive oil
  • 1 small onion, thinly sliced
  • ½ cup thinly sliced bell pepper
  • about 10 mushrooms, sliced
  • 1 small zucchini, thinly sliced
  • 5-6 medium cloves garlic, sliced
  • 2 tsp dried basil (or 2Tbsp minced fresh basil)
  • ½ tsp oregano
  • fresh black pepper
  • ¼ lb. mozzarella cheese, grated
  • 2 small – or 1 medium – ripe tomato(es), sliced

Combine cornmeal, salt, and cold water in a small bowl. Have the boiling water on the stove in a saucepan, and add the cornmeal mixture, whisking. Cook about 10 minutes over low heat, stirring frequently. It will get very thick. Remove from heat, and let cool until it can be handled.

Preheat oven to 275 degrees F. Oil a 10-inch pie pan or baker. Add the polenta, and use a spatula and wet hands to form it into a smooth, thick crust over the bottom and the sides of the pan. Brush the surface with olive oil, and bake uncovered for 45 minutes.

While the crust bakes, heat 1 tbsp olive oil in a medium-sized skillet. Add the onion, and sauté for 5-8 minutes, or until it begins to soften. Add bell pepper, mushrooms, and zucchini, and sauté until everything is tender. Stir in the garlic and herbs, and sauté just a few minutes more.

Turn up the oven to broiling temperature. Sprinkle half the cheese onto the bottom of the baked crust, then add the tomato slices. Spread the sautéed mixture over the tomatoes, and sprinkle the remaining cheese on top. Broil until brown (about 5 minutes), and serve hot.

Source: The New Moosewood Cookbook by Mollie Katzen

 Laura Everage is a writer, editor, swimmer, yoga-lover, wife, and mother of four. Her days start very early in the morning, but thanks to her favorite beverage, coffee, she is able to start each day on a good note. Laura began her journey in all things food and beverage related nearly 20 years ago, as Managing Editor of The Gourmet Retailer. She continues to write about food, coffee, tea and kitchenware and is currently working on a book entitled Courage in a Cup: Women, Coffee and the Global Economy. Laura is also founder and editor of her own website, Family Eats, and is editorial director/partner of Coffee Universe.Her work has appeared in a variety of trade magazines as well as consumer publications Saveur and Consumers’ Digest. Laura’s knowledge of the industry has landed her appearances on both the Food Network and Fine Living Network. To contact Laura, email Laura@familyeats.net.

Reindeer Cupcake Recipe Using HIC’s Cannonball Ice Ball Tray

Reindeer Cupcakes made with the Cannonball Ice Ball Tray

Reindeer Cupcakes made with HIC’s Cannonball Ice Ball Tray

This holiday season we put our Cannonball Ice Ball Tray to the test, for baking as well as ice making… and feeling in a jolly mood, used it to make reindeer cupcakes.  (You could also create dog, cat, or bunny cupcakes… pretty much any animal with a head and body, just get creative with the decorations!) You can find a Cannonball Ice Ball Tray of your own, here, and in gourmet kitchen shops nationwide.

Reindeer Cupcakes Recipe:

First, prepare batter and fill both traditional cupcake cups (for the body)  and the Cannonball Ice Ball Tray for the reindeer heads.

See our Spice and Pumpkin Cake Batter recipe, and how to bake cake in the Cannonball Ice Ball Tray here. Or, you can use any flavor of cake you desire.

Assembling the reindeer cupcakes:

1. After cupcake cups and cake balls are completely cool, following the recipe found here, use a spoon to scoop a small amount of cake from the top, near the edge, of each cupcake. Create a small divot for the reindeer head to sit in.

Creating Divot for Reindeer Cupcake Head

Creating Divot for Reindeer Cupcake Head

2. Melt baking chocolate in a double boiler. We used Rose’s Silicone Baking Bowl.

Melting Chocolate in Rose's Silicone Baking Bowl

Melting Chocolate in Rose’s Silicone Baking Bowl.

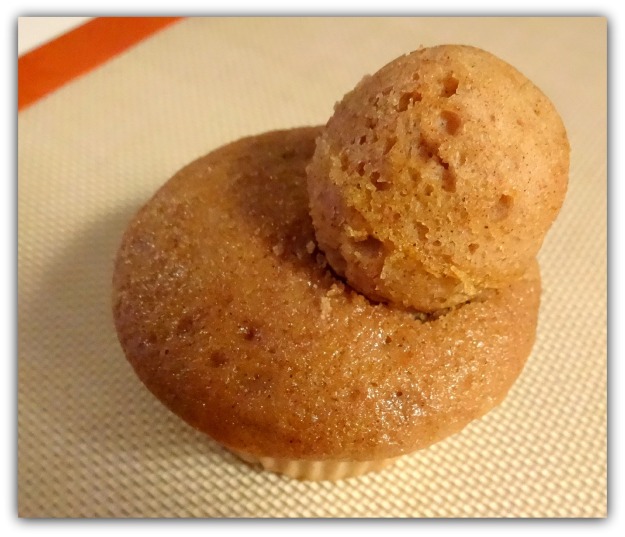
3. Place the cake ball made in the Cannonball Ice Ball Tray into the divot, on top of the melted chocolate, and let cool. This will help hold the head nicely in place.

Reindeer Head on Cupcake Body

Reindeer Head on Cupcake Body

4. Decorate the face, as you choose. We used cinnamon imperials for the nose, dried currants for the eyes, and white icing for the feet and base of the eyes and nose.

5. Creating the antlers – put some melted dark baking chocolate from Rose’s Silicone Baking Bowl (find yours here) into a pastry bag fitted with a fine tip, and pipe the chocolate into antler shapes on a Silpat baking mat. Place in refrigerator to cool.

Reindeer Antlers Piped on Silpat Baking Mat

Reindeer Antlers Piped on Silpat Baking Mat

6. Press the base of each antler into the cupcake behind the reindeer’s head.

Reindeer Cupcakes Made with the Cannonball Ice Ball Tray

Reindeer Cupcakes Made with the Cannonball Ice Ball Tray

Enjoy!

Interested in learning more about HIC, Harold Import Co.? Contact us here.

Contributed by Nicole H., of HIC, Harold Import Co.

Cacao, Almond Milk, and Banana Ice Cream – A Rich Chocolate Summer Delight

Cacao, Almond Milk, and Banana Ice Cream

Cacao, Almond Milk, and Banana Ice Cream

With summer in full swing, a cool treat is always appreciated. We explored venturing beyond our traditional ice cream recipes, and pulled in a few nutritious ingredients to make this rich, chocolatey cacao, almond milk, and banana ice cream.

Cacao Ice Cream Recipe

Cacao Ice Cream Recipe

Cacao, Raw Almond Milk, and Banana Ice Cream Recipe 

Cacao Powder

Cacao Powder

This recipe produces an “ice cream” with an incredibly rich, dark chocolate flavor imparted by the cacao powder, and has a creamy mouthfeel from the homemade almond milk. (You could use store bought almond milk, but the flavor and texture will be a little different.)

Any sweetener of choice can be used in this recipe, but we found that honey and agave nectar both pair well with the rich tasting cacao.

This ice cream was made using a blender and frozen bananas, which is great if you want to get this dessert on the table quickly. If you have an ice cream maker you could first blend all ingredients at room temperature, then  transfer to an ice cream maker to freeze.

Cacao Powder

Cacao Powder

Ingredients:

  • 2 heaping Tbsp Cacao Powder
  • 2 Tbsp Raw Honey or Agave Nectar (or stevia for the sugar sensitive)
  • 1/3 cup cold Homemade Almond Milk using raw almonds (see our recipe here)
  • 2 large frozen bananas (break in 1-inch pieces before freezing)

Tools:

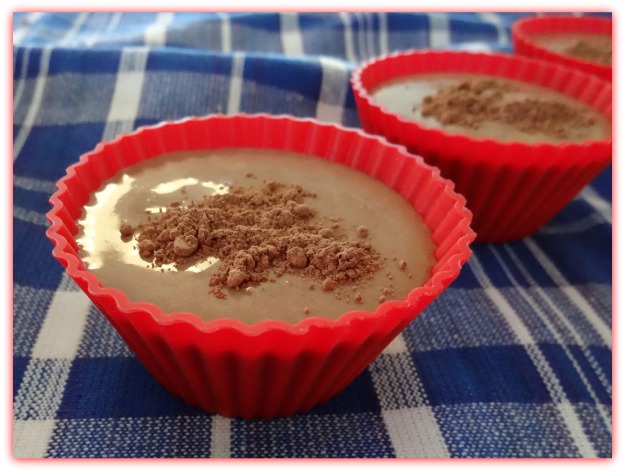
Mrs. Anderson's Baking Silicone Baking Cups and Royal Blue Box Plaid Kitchen Towel

Mrs. Anderson’s Baking Silicone Baking Cups and Royal Blue Box Plaid Kitchen Towel Available from HIC

Place almond milk, cacao powder, and honey or agave in blender and pulse to start mixing slowly. Turning on high power without slowly mixing the cacao powder into the liquid first can cause it to shoot upwards in a cloud of cocoa dust. After almond milk, cacao powder, and honey are mixed gently, increase speed for a few seconds and mix well. Add frozen banana pieces, and pulse to get them moving. Then blend on high until the banana chunks smooth out and an ice cream consistency results. Serve at once, and sprinkle with additional cacao powder if desired. The deep chocolate taste is downright decadent.

*Hot weather tip: If you’re in an especially warm climate, or warm kitchen, ice cream can start to melt quickly after served. Try pouring into chilled ice cream cups (store them in the freezer) to help keep ice cream from melting quickly.

We appreciate our readers, and are interested in hearing more about your culinary adventures. Drop us a line and share what you’re experiencing! We’d love to hear your thoughts, anytime the mood strikes you. 

Contributed by Nicole Herman, of HIC.

Cannonball Ice Ball Tray Does Double Duty – Makes Perfect Round Ice Cubes and Delicious Cake Bites

HIC's Cocktail Ice Ball Tray

HIC’s Cannonball Ice Ball Tray

HIC, Harold Import Co.’s very own Cannonball Ice Ball Tray, previously known as the Cocktail Ice Ball Tray, was created to take care of the need for an ice cube that will dissolve more slowly, leaving your cocktail or any beverage, chilled but not diluted.  Not only does it achieve this goal, but makes a perfect cake pop or cake bite as well! We will show you how to make them step-by-step, below. The size of each cube – 1.5 inches in diameter, means you can use just one in a rocks or cocktail glass, or add many of these frozen spheres when filling an ice tea pitcher or large glass. The larger the piece of solid ice, the slower it will melt into your drink. To get yours, visit Fante’s Kitchen Shop. Coming soon, to fine kitchen retailers nationwide.

To make ice balls or spheres in the Cocktail Cannonball Ice Ball Tray: Fill the bottom portion (you can tell which is the top, because it has small pin holes to allow air to escape) with water, until it’s exactly halfway up to the top edge of the tray.

Cocktail Ice Ball Tray Fill Level for Making Spheres Shaped Ice Cubes

Cocktail Ice Ball Tray Fill Level for Making Spheres Shaped Ice Cubes

Press the top of the mold down until it fits snuggly against the base. Freeze.

Cocktail Ice Ball Tray Fully Filled and Closed, Ready for Freezing

Cocktail Ice Ball Tray Fully Filled and Closed, Ready for Freezing

To remove, run warm water over the outside of the mold for a few seconds. This melts any ice that could have formed between the ice cubes or spheres, so they can each pop out of the mold easily. Now, set the mold down, right side up, and pull the top half off the bottom. The cubes will be sitting in the bottom half of the mold, and will release easily.

Releasing the Sphere Shaped Ice Cubes from the Cocktail Ice Ball Tray

Releasing the Sphere Shaped Ice Cubes from the Cocktail Ice Ball Tray

Removing the Sphere Shaped Ice Cubes

Removing the Sphere Shaped Ice Cubes

Berry Infused Ice Balls Made With HIC's Cocktail Ice Ball Tray

Berry Infused Ice Balls Made With HIC’s Cocktail Ice Ball Tray

Creating berry filled ice balls to slowly infuse your drink with berry flavor is another way to use HIC’s Cannonball Ice Ball Tray. Simply crush fresh or previously frozen berries, such as blueberries, raspberries (shown here) or strawberries, and fill each each round in the bottom half of the tray with the crushed berries, heaping full. Crushing the berries and stuffing and filling each round until heaping full is important, so that the berry mixture is not completely sealed in a thick layer of ice, and will be able to make contact with your drink to allow infusion. Next, add water, and fill the bottom half of the tray until it’s exactly halfway up to the top edge of the tray (as illustrated above). Press the top of the mold down until it fits snuggly against the base. Freeze. Remove ice balls as illustrated above, and place in a glass of fresh water, tea, or juice. It will take a few minutes for the thin ice just covering the outer edges of the berry mixture to start to melt, and reveal the berry beneath. The berry juices will tint your beverage a lovely bright hue, as pictured, and add a subtle berry flavor.

The Cannonball Ice Ball Tray is made of silicone, measures 9.25″ x 3.75″ dishwasher safe, and heat safe up to 500 degrees.

Making Cake Bites or Cake Pops with the Cannonball Ice Ball Tray

Spice Cake Bites Dusted in Powdered Sugar made in HIC's Cocktail Ice Ball Tray

Spice Cake Bites Dusted in Powdered Sugar made in HIC’s Cocktail Ice Ball Tray

The Cannonball Ice Ball Tray serves double duty, not only to make ice balls or spheres, but also works brilliantly for cake bites or cake pops! Below we’ll share a really moist spice and pumpkin cake recipe, as well as a step-by-step guide to making cake bites in the HIC Cannonball Ice Ball Tray.

Spice and Pumpkin Cake Bites Recipe

Ingredients (Dry):

1/2 cup unsalted butter
2 1/4 cups all-purpose flour
2 teaspoons baking soda
1/4 teaspoon salt
Spices: 2 teaspoons cinnamon, 3/4 teaspoon ginger, 1/2 teaspoon nutmeg, and 1/4 teaspoon cloves)

(Wet)
1 whole large egg plus 2 yolks
1 1/2 cups sugar
¼ cup sour cream
1 can (15 ounces) pumpkin puree (not pumpkin pie filling)

Powdered Sugar for dusting

Mix flour, baking soda, salt, and spices. In a separate bowl, mix eggs (room temperature!) sugar, softened butter, sour cream, and pumpkin puree. Gently fold dry ingredients into wet.

How to achieve a super moist cake? Baking maven Rose Levy Beranbaum offers a wonderful tutorial.

Preheat oven to 325, and set the oven rack in the center of the oven.

Using the Cannonball Ice Ball Tray to make the cake bites:

Lightly butter the insides of the rounds of both halves of the tray. Try putting a little butter on a piece of a paper towel and rub the butter into the rounds. It might sound a odd, but doing it this way enables an even and light coating. To see how they would turn out differently, some of the cups in the tray were coated with butter and some with non-stick baking spray. Both popped out of the form equally well after baking.

Use a tablespoon to fill each round in the bottom piece of the mold precisely. You can tell which is the bottom, because it doesn’t have pinholes. The half with the pinholes will be placed on top, and the holes allow for steam or extra batter if overfilled, to escape during baking. Heap the tablespoon with batter, and then fill each hole flush. Go back to the mixing bowl with the spoon to get a bit more batter, and top off each hole so they are overfilled to the point of mounding about ¼ inch above flush, but not so much that it spreads onto the surrounding flat part of the silicone tray.

Press the top half of the mold down onto the bottom half, and squeeze the two together so they fit snugly. Place on a cookie sheet, and bake for 14 minutes. Remove from oven and let the mold sit unopened, cooling, for another 10 minutes.

Removing Cake Bites from the Cocktail Ice Ball Tray

Removing Cake Bites from the Cocktail Ice Ball Tray

Removing Cake Bites

Removing Cake Bites

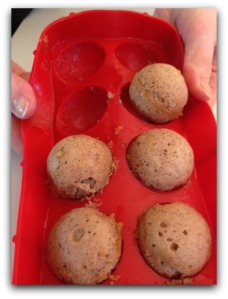
To remove the cake bites, slowly pull the top half of the mold up off the bottom half. Use your finger to gently press down on the top of each peak in the mold, to release the cake bite if it seems hesitant to release. We found we needed to do this on a few, but others released on their own.

Once the top half of the mold is lifted off, hold the bottom half of the mold in your hands, and pop the cake bites out by pressing up on the bottom of each round to release them. Because these are made of cake batter, and not cake batter mixed with frosting as traditional cake pops are, they are softer and a bit more delicate (especially when still warm) so handle gently.

If you find a ridge around the circumference of the cake bite where the mold halves meet, it can be scraped off with a paring knife.

Baked Spice Cake Bites

Baked Spice Cake Bites

You can decorate with frosting, glazes, sprinkles, or simple powdered sugar. To achieve the look of the cake bites shown in this post, sprinkle powered sugar on a plate and roll still barely warm cake bites in the sugar until coated, and serve.

Dusting Spice Cake Bites in Powdered Sugar

Dusting Spice Cake Bites in Powdered Sugar

Spice Cake Bites Dusted in Powdered Sugar made in HIC's Cocktail Ice Ball Tray

Spice Cake Bites Dusted in Powdered Sugar made in HIC’s Cocktail Ice Ball Tray

Enjoy!

To clean the Cannonball Ice Ball Tray, wash in warm soapy water or pop in the dishwasher.

Article Contributed by Nicole H., of HIC