Tag Archives: Pasta Tools

Homemade Spaghetti Noodles Using Fante’s Cousin Arturo’s Pasta Pin

Contributed by Liana, of the Fante family of Philadelphia.

Fante's Cousin Arturo’s Pasta Pin in Use

Fante’s Cousin Arturo’s Pasta Pin in Use

Growing up, we made homemade spaghetti a couple of times a week with a pasta machine. In fact, my nonna had her machine set up on a table in her basement 24/7. That was her permanent pasta making station. After we were done rolling out and cutting the spaghetti, we brushed off the machine with a pastry brush and covered it with a homemade tea cozy until the next Sunday. Imagine that I thought we were totally normal! Doesn’t everyone have a pasta machine on its own altar in the basement? Apparently, not. But good news! You don’t need a pasta machine to make delicious homemade spaghetti.

Fante's Cousin Arturo’s Pasta Pin in Use

Fante’s Cousin Arturo’s Pasta Pin in Use

I’ve talked about our epic Sunday dinners before. Nonna’s favorite pasta, which she called “lasagna,” (but it wasn’t the layered cheese and sauce filled baked casserole we all think of with that name) was simple peasant pasta. We rolled out the sheets of dough, cut them down the center lengthwise, and then cut the pasta every two inches on a diagonal to make rough parallelograms. We boiled it in salted water and served it with fresh gravy, nothing fancy. It saved having to cut the fettuccine or spaghetti on the machine.

My mom talks about her nonna (my great-grandmother) making homemade spaghetti before pasta machines and chitarras (a stringed piece of equipment reminiscent of a guitar that you would press dough through the strings to cut). She rolled out the pasta dough with the handle of an old broom (her makeshift rolling pin) into a rectangular shape the width of the table. Then, she cut the dough into segments the length of spaghetti strands she wanted. Rolling up the segmented dough as though she were making a pinwheel dessert, she expertly sliced thin cross sections of dough with a sharp knife. If she were doing this to herbs it would be fancily called a “chiffonade.” Each cut made a single strand of spaghetti. Talk about a lot of work! (That’s why the peasant lasagna was so popular when making homemade pasta without a machine.) To ease cutting spaghetti without a machine, a clever craftsman created wooden rolling pins with grooves sharp enough to cut through dough for instant strands of spaghetti.

Fante's Cousin Arturo’s Pasta Pin in Use

Fante’s Cousin Arturo’s Pasta Pin in Use

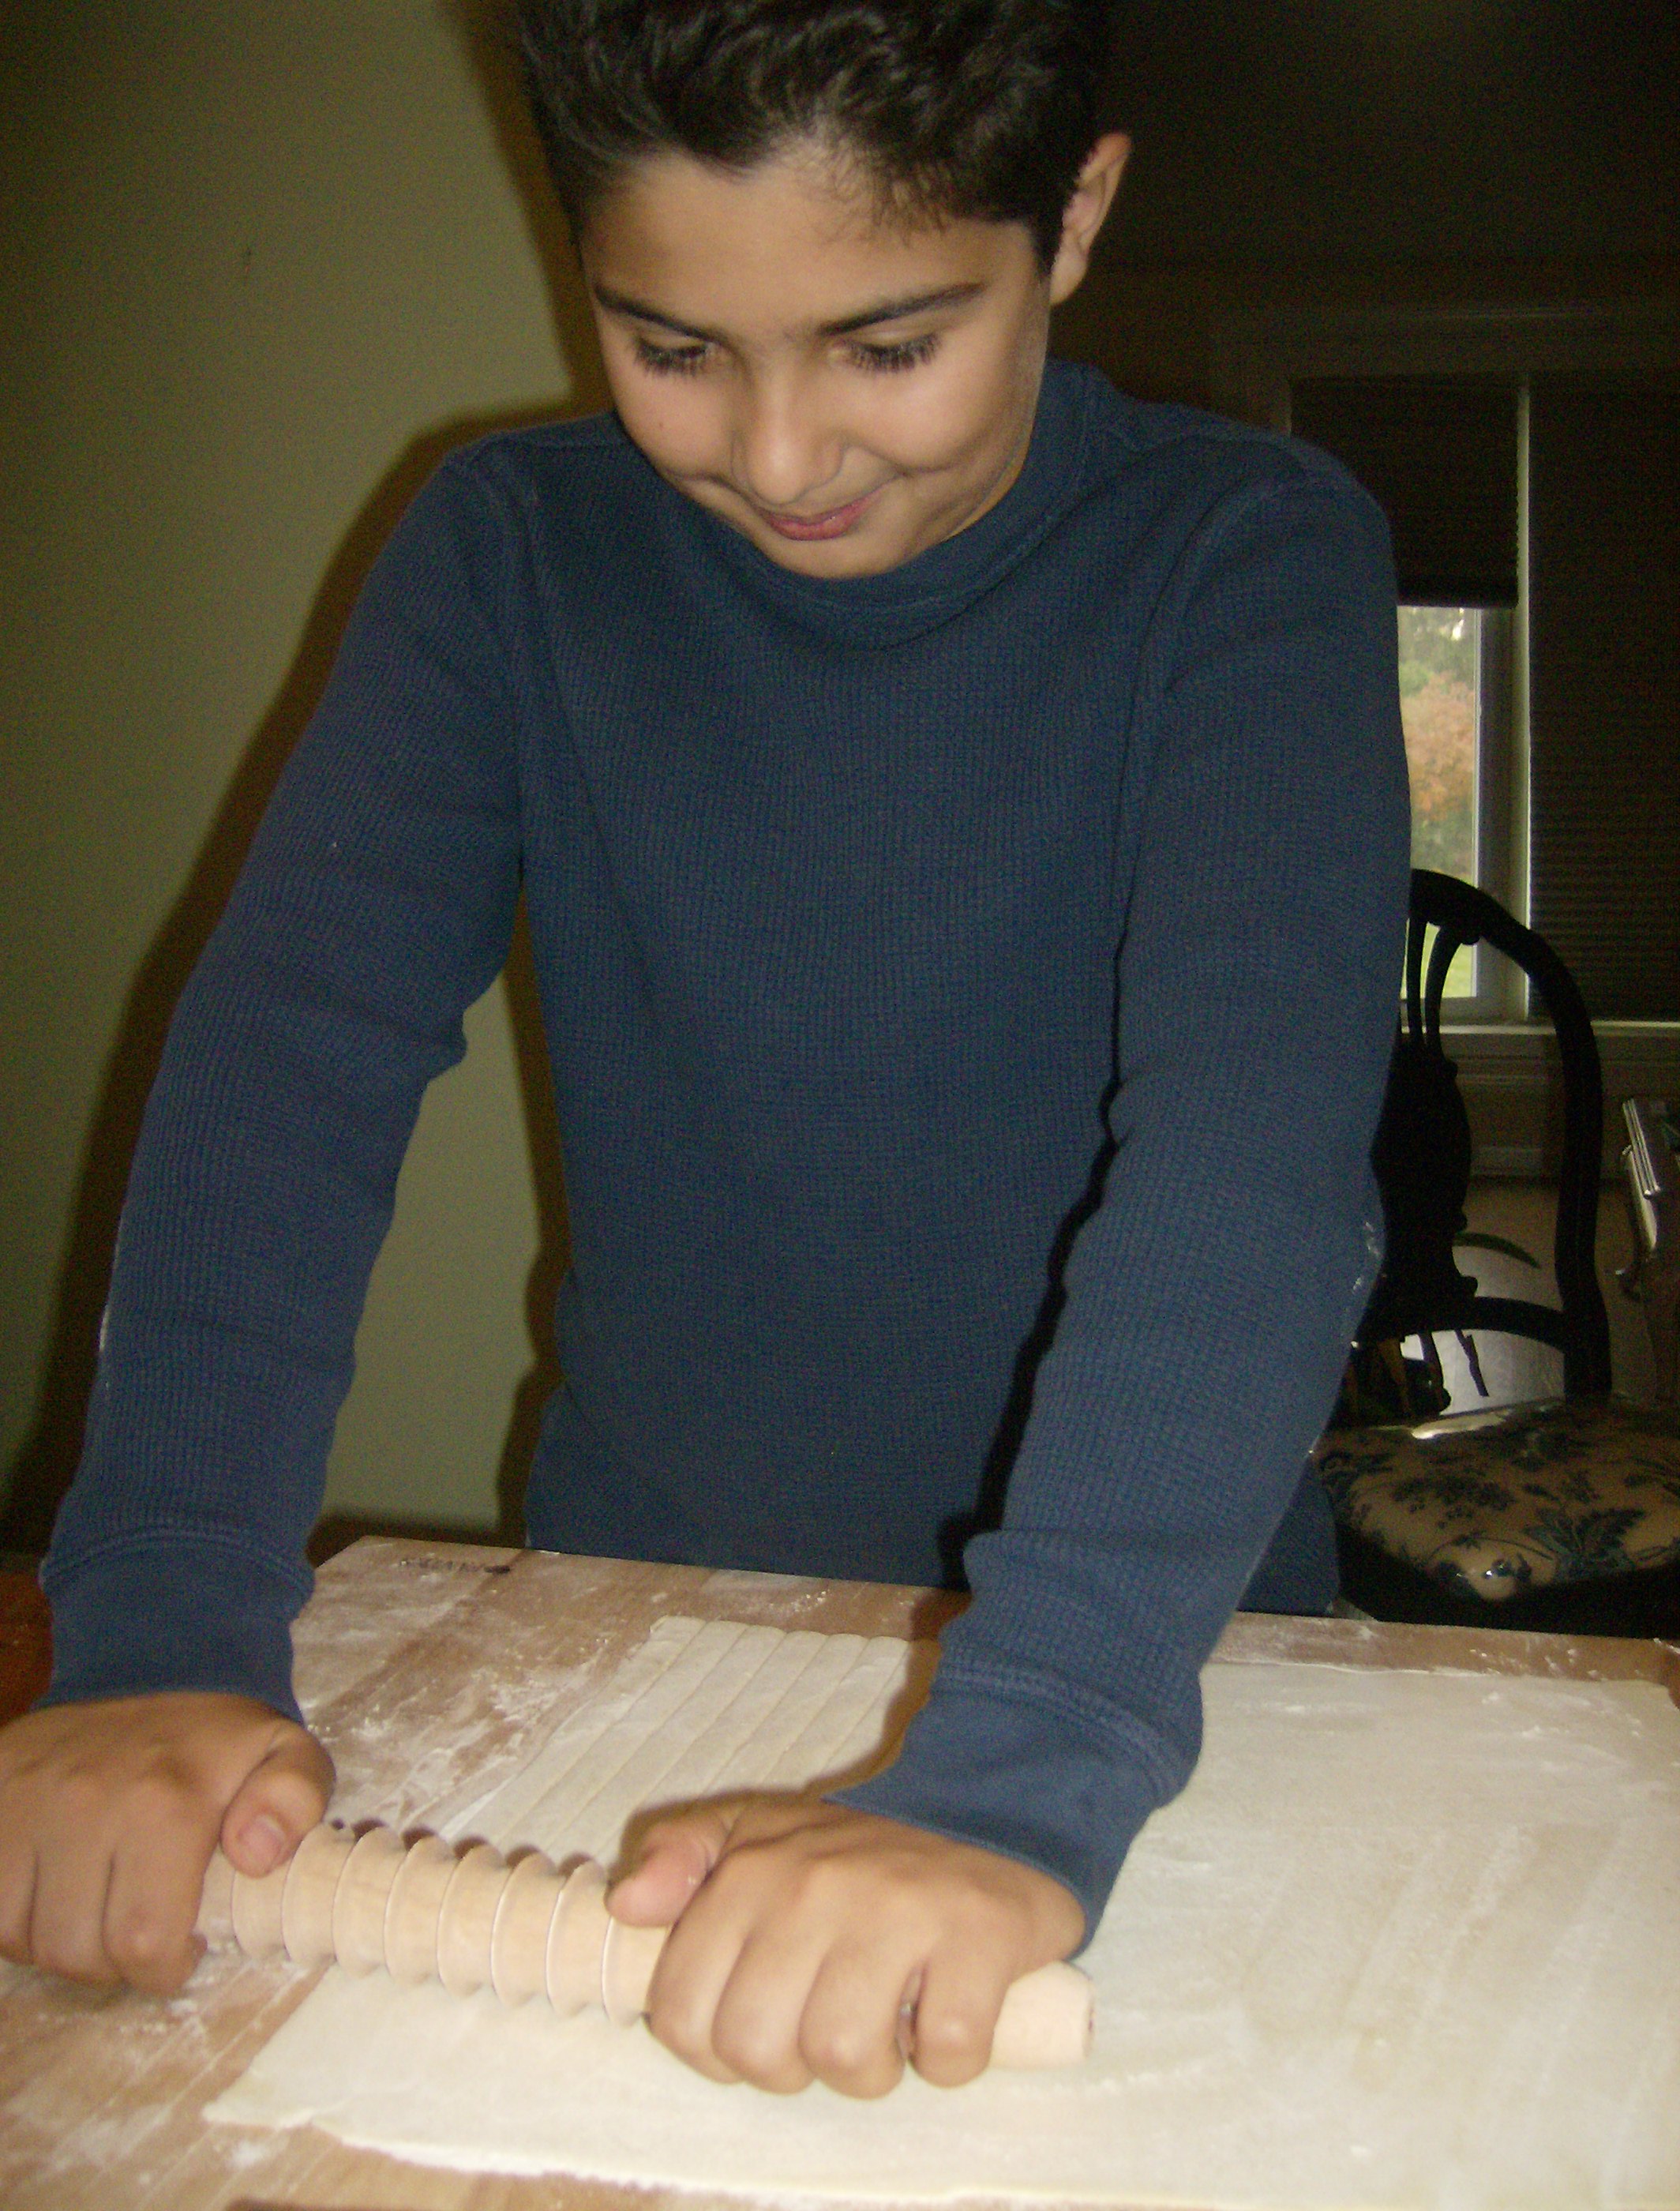
Making homemade spaghetti by hand can be a great project for the family. Knead your favorite pasta dough recipe. Roll it out with a flat rolling pin into a rectangular shape about 1/16” thick and cut it to the desired length of your spaghetti with a knife. Make sure you have incorporated enough flour in your dough so that it is not sticky. The proper consistency will make the pasta much easier to cut and separate. Lightly flour the surface of the pasta dough. Apply even pressure on the pasta pin and roll it slowly down the length of your sheet of dough. If your pasta dough contains egg, the pasta pin will deeply score the dough and you will separate the strands by hand. (This is great fun for tiny fingers on the budding chefs in the kitchen!) To make separating strands easier, hold one hand and fingers on the main part of the dough and lightly pull on the single strand with the other hand to separate it from the pack. It goes very quickly once you get the hang of it (or delegate the job). If you make your pasta dough without egg, the spaghetti strands should separate easily just by rolling the pin across the dough. Cook and enjoy as you would your normal homemade spaghetti!

Fante’s Cousin Arturo’s Pasta Pin can be purchased from Fante’s Kitchenware Shop in Philadelphia, and on their website.

Find out how to place a wholesale order for any products from the Fante’s line, from Harold Import Co.

Homemade Cavatelli from The Ranting Chef

Fante's Cousin Elisa's Cavatelli Maker

Fante’s Cousin Elisa’s Cavatelli Maker

Heard the Rantings of an Amateur Chef? This is the blog of Pat Geyer, who embarks on frequent culinary adventures, kindly sharing his lessons and excitement with lucky fans. We wanted to share his recent homemade cavatelli quest with you here at The Useful Tool. Pat put our Fante’s Cousin Elisa’s Cavatelli Maker to the test (made in partnership with the Fante family of Philadelphia) teaching readers how to turn out beautiful shell-shaped cavatelli pasta noodles. If you’ve ever wanted to learn how to make homemade cavatelli, Pat has you covered.

Cheese Spaetzle Recipe and Spaetzle Maker or “Hobel” Tips

Cheese Spaetzle or käsespätzle

Cheese Spaetzle or käsespätzle

Spätzle, as my Grandma Esther would spell it, loosely means “little sparrow” and gets it’s name from a time before kitchen tools like spaetzle makers, or “hobels” as they’re also known, were readily available. Historically it was shaped by hand with a spoon or knife and was thought to resemble small birds. Spaetzle is the base of many dishes in a cookbook my Grandma presented to me on my 16th birthday; A fantastic compilation of family photographs spanning 5 generations, rustic recipes laden with meat and starchy vegetables meant to feed a large farming family, ingredient lists calling for everything from goat’s milk to “Aunt Edna’s canned pears,” plenty of spaetzle, and clippings from newspapers and magazines that had significance to my Grandmother either culinary or personal. This book is a time capsule and I smile every time I go through it.

Spaetzle is traditionally used as a base for both sweet and savory dishes, soups, and one-dish meals, as it is in my family cookbook. It’s inexpensive, filling, and can be modified to please a variety of palates. I’ve attempted every recipe in Grandma’s cookbook including spaetzle with cherry sauce made with Grandma next to me, others like squash pie made along side my dad, and the one I’m sharing here – Käse or Light Cheese Spaetzle – I make for my family. Grandma Esther left a sweet message in the book, noting, “Dear Nee Nee, some of the dishes may not be so practical for modern times (Maybe she was thinking of the kidney pie? My ancestors didn’t waste a bit.) I hope you find a few that you can enjoy.” And I have. The flavor and texture of spaetzle is comforting, and brings warm feelings of nostalgia. It’s quick to whip together for guests, plus one batch of noodles can be topped a variety of ways to suit everyone around the table. I hope you might enjoy it too.

Grandma Esther’s käsespätzle or Spaetzle with Cheese Recipe

Spaetzle Ingredients

Spaetzle Ingredients

Spaetzle Ingredients (Makes 2 servings; Modified from original which served 10)

1/2 cup whole wheat flour (this imparts a nuttier, heartier texture)
1/2 cup plus 2 tablespoons all-purpose flour
1 teaspoon salt
1 teaspoon ground pepper
2 large eggs
1/4 cup milk

Spaetzle Dressing:
2 pats butter
½ cup grated cheese (my Grandmother used Emmentaler, a harder German cheese) Here is a great website with a guide to German cheeses, for your perusal.
Additional salt and pepper to season

Tools: Spaetzle Maker or Hobel. Visit HIC’s “Where to Buy” page to find one at a kitchen shop near you.

Directions:

Combine the flour, salt and pepper.

Dry Spaetzle Ingredients

Dry Spaetzle Ingredients

Wet Spaetzle Ingredients

Wet Spaetzle Ingredients

In a second bowl, whisk the eggs and then add in the milk.

Create a depression in the center of the flour mixture and pour in the wet ingredients. The flour should be added and blended gently and slowly, scraping from the sides of the bowl, until well combined.

Wet and Dry Spaetzle ingredients

Blend dry ingredients slowly into wet spaetzle ingredients

The dough should be thick but not ridged, like a stiff muffin batter. I find the dough is easiest to work with, when I refrigerate for 10 minutes before placing in the spaetzle maker or “Hobel.”

Bring a pot of lightly salted water to a boil, and then reduce to a simmer. Make sure the pot is wide enough to allow for the spaetzle maker to sit on top, if using this device. Place the spaetzle maker over the pot, and clip to one edge.

Spaetzle maker clipping to 4 quart pot

Spaetzle maker clipping to 4 quart pot

Fill the hopper with a ball of dough, filling it to the top. Slide the hopper across, and watch the dough fall through the holes, into the simmering pot below!

Moving dough through spaetzle maker

Moving dough through spaetzle maker

Do this in batches so you don’t get a thick layer of spaetzle accumulating, which can clump together. With this size recipe, and using a 4 quart pot, I found I don’t have to do batches, I can make all the spaetzle at once and there’s enough surface area on the top of the pot to deter clumping. This dough recipe fills the hoper of the spaetzle maker exactly once. You know the spaetzle is done, when it floats to the surface of the pot.

floating spaetzle

floating spaetzle

Stir it gently to prevent it from sticking. Remove the finished spaetzle noodles form the pot with a slotted spoon or dump the whole pot into a smooth surface colander (not a mesh strainer, I find it sticks to the mesh) and give it a light rinse of cold water.

Place the rinsed spaetzle into a bowl with sides high enough to permit tossing, and drop the 2 pats of butter on top. The heat of the spaetzle will melt the butter. Stir in. Sprinkle the cheese into the bowl as well, and stir to combine with the buttered spaetzle. Dish into smaller bowls, and add a little more salt and pepper to taste, if desired. (Or, more cheese on top.) Dig in!

Cheese Spaetzle

Cheese Spaetzle

Article Contributed by Nicole H., of HIC

Aunt Gina’s Lasagna – A Traditional Italian Recipe from the Fante Family of Philadelphia

Fante Family

Fante Family

Sunday Dinners: The Special Occasions. Contributed by The Fante family.

Since I was a little girl, Sundays were reserved for family.  Both my parents’ businesses – Fante’s (a kitchen wares shop) and Esposito’s (a butcher shop) in the Italian Market of Philadelphia both closed by 2PM in order to have mid-afternoon Sunday dinner.  Along with my sister and 3 cousins, we would spend the whole day at our Nonni’s (grandparents’) home:  going to church, helping cook dinner and playing together. My Nonna would wake up at the crack of dawn to chop all the vegetables for the gravy and start it simmering with the tomatoes which she would put through a food mill to create a uniform sauce.  She would then make the meatballs and sausage, fry them, and add them to the sauce, which would be simmering on low heat by the time my sister and I woke up and made it downstairs for our traditional chocolate chip pancake breakfast (we were totally spoiled).

Filled to the brim with pancakes, we would help her to make the pasta dough and leave it to rest, covered, while we went to church.  When we returned, we would continue to cook the sauce, allowing it to simmer while we rolled out the dough on the manual pasta maker.  All of the cousins took turns working the crank and catching the pasta – it was always at least a 2-cousin job.

Normal Sunday dinners meant fresh meatballs, sausage and gravy served with homemade pasta of some kind.  For special occasions like birthdays and holidays, we would do trays of lasagna. Nonna would supervise all of the extra tasks for making the lasagna, the most important being the fresh grated cheese.  We love cheese!  And did I mention our Sunday dinners included an epic amount of food?  Every week about 12 family members would join us around a table meant for 6, filled with enough food to comfortably feed 30.  These large trays of lasagna require a lot of cheese.  The older cousins were responsible to grate about a pound of parmesan and shred about 2 pounds of mozzarella.  We all proudly sported some scarred knuckles from the rasp we used [that we swear] she had brought with her from Italy.  It was torture.  She eventually replaced it with a large rotary grater which made the job so much easier!   It handled the volume, and it was simple to swap the drums for each cheese.  We could also all take turns since it didn’t require as much elbow grease or Band-Aids. We are so excited to have a new cousin (#6) – Nico!  We can’t wait for the day we can enlist his help to use the grater named after him to make some Sunday dinner lasagna. Here is the recipe for a smaller-portion of our lasagna.  We typically make it with just sauce and cheese. You can certainly substitute bought lasagna for the pasta portions and add meat to customize it to your family’s tastes.  You can also find many of our family recipes (as well as embarrassing family photos) included with the Fante’s line of products.  Buon appetito!

Aunt Gina of the Fante Family

Aunt Gina of the Fante Family

Aunt Gina’s Lasagna

Makes 6 to 8 servings
1 lb. homemade lasagna strips
1 lb. ground meat (beef, pork or mixture)
4 cups salsa marinara (recipe, scroll down)
16 oz. mozzarella, shredded
16 oz. grated cheese (parmigiano and pecorino)

1. Brown ground meat in a fry pan then drain off the fat. Place salsa marinara in a sauce pan, stir in browned meat and heat gently over a medium flame until it’s hot. Stir occasionally to keep it from sticking.

2. Meanwhile, roll pasta dough (scroll down for recipe) to desired thickness and cut into 2 ½” wide strips (Try Cousin Daniele’s Expandable Dough Cutter. Available at Fante’s)

Fante's Cousin Daniele's Expandable Dough Cutter

Fante’s Cousin Daniele’s Expandable Dough Cutter

3. Spoon hot meat sauce into the bottom of a 11” x 15” baking dish.

4. Place a single layer of lasagna strips into the baking dish, lengthwise. Layer with grated cheese (try Fante’s Papa Francesco’s Rotary Cheese Grater or Fante’s Cousin Nico’s Suction Base Cheese Grater, available at Fante’s)  and mozzarella then top with meat sauce. Repeat these steps for the second layer but place lasagna strips widthwise. Alternating the direction of the pasta strips will keep your lasagna from falling apart when it’s cut.

Fante's Cousin Nico's Suction Base Cheese Grater

Fante’s Cousin Nico’s Suction Base Cheese Grater

5. Repeat step 5 to make as many layers as you like. Finish by spooning more sauce on top and sprinkle with grated cheese. 6. Bake at 350°F for 45 minutes or until sauce and cheese are bubbling. Remove lasagna from the oven and let rest for 30 minutes before serving.

Grandma Nadia of the Fante Family

Grandma Nadia of the Fante Family

Grandma Nadia’s Pasta Dough

Makes 2 pounds of dough
2 eggs, at room temperature
4 cups unbleached all-purpose flour
4 to 8 ounces tepid water, as needed

1. Place flour on a wooden board, make a well and break the eggs into it.

2. If you prefer, you can mix it in a bowl with a fork or in an electric mixer with a dough hook.

Pasta Dough Step 1

Pasta Dough Step 1

NadiasPastaDoughStep2

Nadias Pasta Dough Step 2

3. Slowly incorporate the flour into the eggs. There should be just enough moisture so the ingredients stick together to form a smooth, elastic ball but not enough to stick to the table or bowl.

Pasta Dough Step 3

Pasta Dough Step 3

Nadias Pasta Dough Step 4

Pasta Dough Step 4

4. You may need to add a bit of water if the dough is too dry and crumbly, or a bit more flour if too wet and sticky.

5. Cover the dough with a clean towel and let it set for about 30 minutes.

6. Use a sharp knife to cut off a chunk from the ball (photo 4).

7. Flatten the chunk of dough with the heal of your hand then roll it out to the desired thickness with a floured rolling pin.

8. Proceed with Step 2 of Aunt Gina’s lasagna recipe instructions, above.

Attilio of the Fante Family

Attilio of the Fante Family

Attilio’s and Mariella’s Salsa Marinara – Marinara Sauce

Makes 1 quart (4 to 6 servings)
36-oz. can crushed tomatoes
5 cloves garlic, coarsely chopped (Try Fante’s Uncle Cristian’s Garlic Slicer and Grater, available at Fante’s)

Fante's Uncle Cristians Garlic Slicer and Grater

Fante’s Uncle Cristians Garlic Slicer and Grater

¼ onion, coarsely chopped
Olive oil Salt, pepper, and red pepper flakes to taste

1. Sauté garlic, onion and red pepper in olive oil. Remove them from the oil before they brown.

2. Add tomatoes.

3. Simmer for about 40 minutes.

4. After 15 minutes add salt and pepper to taste.

5. After another 30 minutes, check sauce for consistency; if too watery, leave lid off to reduce.

6. Stir often to avoid sticking, especially if the pot you’re using does not have a heavy bottom.

Buon appetito!