Monthly Archives: June 2013

Cannonball Ice Ball Tray Does Double Duty – Makes Perfect Round Ice Cubes and Delicious Cake Bites

HIC's Cocktail Ice Ball Tray

HIC’s Cannonball Ice Ball Tray

HIC, Harold Import Co.’s very own Cannonball Ice Ball Tray, previously known as the Cocktail Ice Ball Tray, was created to take care of the need for an ice cube that will dissolve more slowly, leaving your cocktail or any beverage, chilled but not diluted.  Not only does it achieve this goal, but makes a perfect cake pop or cake bite as well! We will show you how to make them step-by-step, below. The size of each cube – 1.5 inches in diameter, means you can use just one in a rocks or cocktail glass, or add many of these frozen spheres when filling an ice tea pitcher or large glass. The larger the piece of solid ice, the slower it will melt into your drink. To get yours, visit Fante’s Kitchen Shop. Coming soon, to fine kitchen retailers nationwide.

To make ice balls or spheres in the Cocktail Cannonball Ice Ball Tray: Fill the bottom portion (you can tell which is the top, because it has small pin holes to allow air to escape) with water, until it’s exactly halfway up to the top edge of the tray.

Cocktail Ice Ball Tray Fill Level for Making Spheres Shaped Ice Cubes

Cocktail Ice Ball Tray Fill Level for Making Spheres Shaped Ice Cubes

Press the top of the mold down until it fits snuggly against the base. Freeze.

Cocktail Ice Ball Tray Fully Filled and Closed, Ready for Freezing

Cocktail Ice Ball Tray Fully Filled and Closed, Ready for Freezing

To remove, run warm water over the outside of the mold for a few seconds. This melts any ice that could have formed between the ice cubes or spheres, so they can each pop out of the mold easily. Now, set the mold down, right side up, and pull the top half off the bottom. The cubes will be sitting in the bottom half of the mold, and will release easily.

Releasing the Sphere Shaped Ice Cubes from the Cocktail Ice Ball Tray

Releasing the Sphere Shaped Ice Cubes from the Cocktail Ice Ball Tray

Removing the Sphere Shaped Ice Cubes

Removing the Sphere Shaped Ice Cubes

Berry Infused Ice Balls Made With HIC's Cocktail Ice Ball Tray

Berry Infused Ice Balls Made With HIC’s Cocktail Ice Ball Tray

Creating berry filled ice balls to slowly infuse your drink with berry flavor is another way to use HIC’s Cannonball Ice Ball Tray. Simply crush fresh or previously frozen berries, such as blueberries, raspberries (shown here) or strawberries, and fill each each round in the bottom half of the tray with the crushed berries, heaping full. Crushing the berries and stuffing and filling each round until heaping full is important, so that the berry mixture is not completely sealed in a thick layer of ice, and will be able to make contact with your drink to allow infusion. Next, add water, and fill the bottom half of the tray until it’s exactly halfway up to the top edge of the tray (as illustrated above). Press the top of the mold down until it fits snuggly against the base. Freeze. Remove ice balls as illustrated above, and place in a glass of fresh water, tea, or juice. It will take a few minutes for the thin ice just covering the outer edges of the berry mixture to start to melt, and reveal the berry beneath. The berry juices will tint your beverage a lovely bright hue, as pictured, and add a subtle berry flavor.

The Cannonball Ice Ball Tray is made of silicone, measures 9.25″ x 3.75″ dishwasher safe, and heat safe up to 500 degrees.

Making Cake Bites or Cake Pops with the Cannonball Ice Ball Tray

Spice Cake Bites Dusted in Powdered Sugar made in HIC's Cocktail Ice Ball Tray

Spice Cake Bites Dusted in Powdered Sugar made in HIC’s Cocktail Ice Ball Tray

The Cannonball Ice Ball Tray serves double duty, not only to make ice balls or spheres, but also works brilliantly for cake bites or cake pops! Below we’ll share a really moist spice and pumpkin cake recipe, as well as a step-by-step guide to making cake bites in the HIC Cannonball Ice Ball Tray.

Spice and Pumpkin Cake Bites Recipe

Ingredients (Dry):

1/2 cup unsalted butter
2 1/4 cups all-purpose flour
2 teaspoons baking soda
1/4 teaspoon salt
Spices: 2 teaspoons cinnamon, 3/4 teaspoon ginger, 1/2 teaspoon nutmeg, and 1/4 teaspoon cloves)

(Wet)
1 whole large egg plus 2 yolks
1 1/2 cups sugar
¼ cup sour cream
1 can (15 ounces) pumpkin puree (not pumpkin pie filling)

Powdered Sugar for dusting

Mix flour, baking soda, salt, and spices. In a separate bowl, mix eggs (room temperature!) sugar, softened butter, sour cream, and pumpkin puree. Gently fold dry ingredients into wet.

How to achieve a super moist cake? Baking maven Rose Levy Beranbaum offers a wonderful tutorial.

Preheat oven to 325, and set the oven rack in the center of the oven.

Using the Cannonball Ice Ball Tray to make the cake bites:

Lightly butter the insides of the rounds of both halves of the tray. Try putting a little butter on a piece of a paper towel and rub the butter into the rounds. It might sound a odd, but doing it this way enables an even and light coating. To see how they would turn out differently, some of the cups in the tray were coated with butter and some with non-stick baking spray. Both popped out of the form equally well after baking.

Use a tablespoon to fill each round in the bottom piece of the mold precisely. You can tell which is the bottom, because it doesn’t have pinholes. The half with the pinholes will be placed on top, and the holes allow for steam or extra batter if overfilled, to escape during baking. Heap the tablespoon with batter, and then fill each hole flush. Go back to the mixing bowl with the spoon to get a bit more batter, and top off each hole so they are overfilled to the point of mounding about ¼ inch above flush, but not so much that it spreads onto the surrounding flat part of the silicone tray.

Press the top half of the mold down onto the bottom half, and squeeze the two together so they fit snugly. Place on a cookie sheet, and bake for 14 minutes. Remove from oven and let the mold sit unopened, cooling, for another 10 minutes.

Removing Cake Bites from the Cocktail Ice Ball Tray

Removing Cake Bites from the Cocktail Ice Ball Tray

Removing Cake Bites

Removing Cake Bites

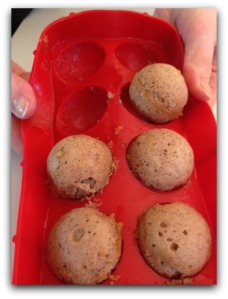
To remove the cake bites, slowly pull the top half of the mold up off the bottom half. Use your finger to gently press down on the top of each peak in the mold, to release the cake bite if it seems hesitant to release. We found we needed to do this on a few, but others released on their own.

Once the top half of the mold is lifted off, hold the bottom half of the mold in your hands, and pop the cake bites out by pressing up on the bottom of each round to release them. Because these are made of cake batter, and not cake batter mixed with frosting as traditional cake pops are, they are softer and a bit more delicate (especially when still warm) so handle gently.

If you find a ridge around the circumference of the cake bite where the mold halves meet, it can be scraped off with a paring knife.

Baked Spice Cake Bites

Baked Spice Cake Bites

You can decorate with frosting, glazes, sprinkles, or simple powdered sugar. To achieve the look of the cake bites shown in this post, sprinkle powered sugar on a plate and roll still barely warm cake bites in the sugar until coated, and serve.

Dusting Spice Cake Bites in Powdered Sugar

Dusting Spice Cake Bites in Powdered Sugar

Spice Cake Bites Dusted in Powdered Sugar made in HIC's Cocktail Ice Ball Tray

Spice Cake Bites Dusted in Powdered Sugar made in HIC’s Cocktail Ice Ball Tray

Enjoy!

To clean the Cannonball Ice Ball Tray, wash in warm soapy water or pop in the dishwasher.

Article Contributed by Nicole H., of HIC

Cheese Spaetzle Recipe and Spaetzle Maker or “Hobel” Tips

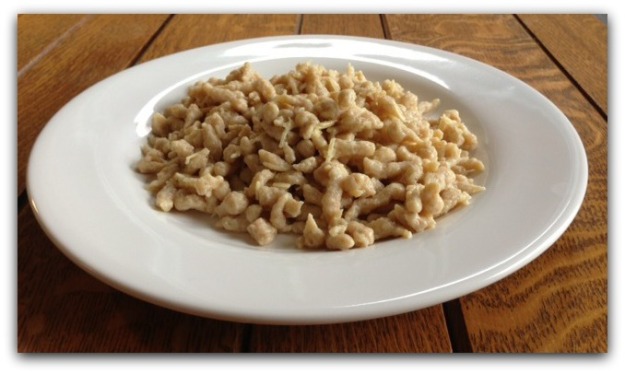
Cheese Spaetzle or käsespätzle

Cheese Spaetzle or käsespätzle

Spätzle, as my Grandma Esther would spell it, loosely means “little sparrow” and gets it’s name from a time before kitchen tools like spaetzle makers, or “hobels” as they’re also known, were readily available. Historically it was shaped by hand with a spoon or knife and was thought to resemble small birds. Spaetzle is the base of many dishes in a cookbook my Grandma presented to me on my 16th birthday; A fantastic compilation of family photographs spanning 5 generations, rustic recipes laden with meat and starchy vegetables meant to feed a large farming family, ingredient lists calling for everything from goat’s milk to “Aunt Edna’s canned pears,” plenty of spaetzle, and clippings from newspapers and magazines that had significance to my Grandmother either culinary or personal. This book is a time capsule and I smile every time I go through it.

Spaetzle is traditionally used as a base for both sweet and savory dishes, soups, and one-dish meals, as it is in my family cookbook. It’s inexpensive, filling, and can be modified to please a variety of palates. I’ve attempted every recipe in Grandma’s cookbook including spaetzle with cherry sauce made with Grandma next to me, others like squash pie made along side my dad, and the one I’m sharing here – Käse or Light Cheese Spaetzle – I make for my family. Grandma Esther left a sweet message in the book, noting, “Dear Nee Nee, some of the dishes may not be so practical for modern times (Maybe she was thinking of the kidney pie? My ancestors didn’t waste a bit.) I hope you find a few that you can enjoy.” And I have. The flavor and texture of spaetzle is comforting, and brings warm feelings of nostalgia. It’s quick to whip together for guests, plus one batch of noodles can be topped a variety of ways to suit everyone around the table. I hope you might enjoy it too.

Grandma Esther’s käsespätzle or Spaetzle with Cheese Recipe

Spaetzle Ingredients

Spaetzle Ingredients

Spaetzle Ingredients (Makes 2 servings; Modified from original which served 10)

1/2 cup whole wheat flour (this imparts a nuttier, heartier texture)
1/2 cup plus 2 tablespoons all-purpose flour
1 teaspoon salt
1 teaspoon ground pepper
2 large eggs
1/4 cup milk

Spaetzle Dressing:
2 pats butter
½ cup grated cheese (my Grandmother used Emmentaler, a harder German cheese) Here is a great website with a guide to German cheeses, for your perusal.
Additional salt and pepper to season

Tools: Spaetzle Maker or Hobel. Visit HIC’s “Where to Buy” page to find one at a kitchen shop near you.

Directions:

Combine the flour, salt and pepper.

Dry Spaetzle Ingredients

Dry Spaetzle Ingredients

Wet Spaetzle Ingredients

Wet Spaetzle Ingredients

In a second bowl, whisk the eggs and then add in the milk.

Create a depression in the center of the flour mixture and pour in the wet ingredients. The flour should be added and blended gently and slowly, scraping from the sides of the bowl, until well combined.

Wet and Dry Spaetzle ingredients

Blend dry ingredients slowly into wet spaetzle ingredients

The dough should be thick but not ridged, like a stiff muffin batter. I find the dough is easiest to work with, when I refrigerate for 10 minutes before placing in the spaetzle maker or “Hobel.”

Bring a pot of lightly salted water to a boil, and then reduce to a simmer. Make sure the pot is wide enough to allow for the spaetzle maker to sit on top, if using this device. Place the spaetzle maker over the pot, and clip to one edge.

Spaetzle maker clipping to 4 quart pot

Spaetzle maker clipping to 4 quart pot

Fill the hopper with a ball of dough, filling it to the top. Slide the hopper across, and watch the dough fall through the holes, into the simmering pot below!

Moving dough through spaetzle maker

Moving dough through spaetzle maker

Do this in batches so you don’t get a thick layer of spaetzle accumulating, which can clump together. With this size recipe, and using a 4 quart pot, I found I don’t have to do batches, I can make all the spaetzle at once and there’s enough surface area on the top of the pot to deter clumping. This dough recipe fills the hoper of the spaetzle maker exactly once. You know the spaetzle is done, when it floats to the surface of the pot.

floating spaetzle

floating spaetzle

Stir it gently to prevent it from sticking. Remove the finished spaetzle noodles form the pot with a slotted spoon or dump the whole pot into a smooth surface colander (not a mesh strainer, I find it sticks to the mesh) and give it a light rinse of cold water.

Place the rinsed spaetzle into a bowl with sides high enough to permit tossing, and drop the 2 pats of butter on top. The heat of the spaetzle will melt the butter. Stir in. Sprinkle the cheese into the bowl as well, and stir to combine with the buttered spaetzle. Dish into smaller bowls, and add a little more salt and pepper to taste, if desired. (Or, more cheese on top.) Dig in!

Cheese Spaetzle

Cheese Spaetzle

Article Contributed by Nicole H., of HIC

Carbon Steel Wok Meets Non-Stick Wok. An Interview with Helen Chen.

Non-Stick Wok

Non-Stick Wok

Carbon Steel Wok

Carbon Steel Wok

Article contributed by Nicole Herman, of HIC

Not once in the time that I’ve had the privilege of knowing renowned Asian Chef Helen Chen, have I engaged in conversation with her and walked away without wishing I’d captured her lesson on audio tape. The consummate educator, she’s candid, personable, speaking in a delightfully up-tempo, animated voice. I recently had the pleasure of talking with Helen a bit about her heritage, which is covered in the first part of this post, and discussing the pinnacle of her kitchen from childhood to present day — the quintessential wok. We address the question often asked, “Which is best? A carbon steel wok or a non-stick wok?”

Helen Chen with her mother, Joyce.

Helen Chen with her mother, Joyce.

Nicole Herman: Helen, your mother Joyce Chen was a well-known Asian chef, so you must have been exposed to a lot of great food and cooking equipment while you were growing up. Is that true?

Helen: Absolutely. In terms of food, when I wrote my first cookbook I made a list of all the dishes I remember my mother cooking at home. I came up with 100 dishes! In terms of being exposed to food, I was. My mother was a fabulous cook, mostly Chinese food. I can’t remember all 100 dishes now; many were specialties from Shanghai where she grew up, and Chinese comfort food, festival foods enjoyed during the dragon boat fest or Chinese New Year. Many times a year we had celebratory food.

Growing up we never had a round-bottom wok, mother didn’t believe in them because she felt it didn’t fit properly on the American stove even with the ring which is used to support the wok when  on a regular range, helping direct heat to the bottom of the wok and provide stability. Mother used a heavy duty pressure cooker pot. This way there were no hot spots; high sides enable stirring without food falling out. Thinking about the traditional Chinese kitchen, it tends to be a spartan place. Mother used the pressure cooker pot and wooden spoons. She wanted a round edge to get into the pan corners and she liked cooking to be quiet. Good knives, both Chinese style and western style, and chopsticks were also important. She used bamboo chopsticks in cooking, for stirring and picking up pieces. Gadgets were at a minimum as not many were on the market. This was in the 50’s – the pressure cooker was aluminum, as I recall. We were living in Cambridge at this time, where I grew up.

Helen's Mother's Wooden Spoon.

Helen’s Mother’s Wooden Spoon.

N: What cookware and gadgets were essentials for your mom, and are they the same products that are essentials for you?

Helen: Mom was the first person to develop a flat-bottom wok, which is my number one go-to tool still today. In China, they had a stove with a hole and the round-bottom wok sat in the hole, with the base close to the heat source. Since we had flat stoves in the US, mother developed a wok for this type of stove. Today it’s called a stir fry pan. In the early days no one understood it because they hadn’t seen one. They thought woks had a round-bottom. It took years to educate people on the benefits of a flat-bottom wok.

N: What are the benefits of a flat-bottom wok?

Helen: A Flat-bottom fits securely on a burner; it’s safer, and more stable. Mother added a skillet type handle instead of the two short wire handles that were common on the round-bottom wok; the latter was impractical as it meant you needed two hands to pick it up, and another person to help you get ingredients out.

Everyone now understands the importance of a flat-bottom wok. In China today, more people use propane and have stoves with flat burners in urban areas and most people there also now use a flat-bottom wok instead of the round-bottom style.

With the Helen’s Asian Kitchen line, we have taken the flat-bottom wok design and made it into a quality piece- added nonstick coating, made with a carbon steel of a heavier gauge, the handles are riveted and not just spot welded. We have good pricing and higher quality. It stems from the original design from my mom, but higher quality.

N: What piece of cookware or kitchen gadget has been the most helpful for you, or made a dish you make easier to create?

Helen: The flat-bottom 14” wok or the 12” stir fry pan.

N: Given today’s modern cookware and gadgets, do you find that creating great Asian cuisine is any easier for the home chef than it would have been, say, 50 years ago?

Helen: Yes. Better equipment has made the preparation easier. A good peeler that’s sharp and doesn’t cut into your hand helps, a good garlic press helps, I find there’s more comfort in today’s tools. Better materials and better designs are safer, easier, and easier to clean. Some of the mandolines out of Japan are very useful for julienne ingredients.

N: Many home chefs enjoy stir fry, but may be intimidated by the idea of using a wok at home. Do you have words of advice to ease the mind of a timid first time wok user or potential purchaser?

Helen: In general, everyone should use a flat-bottom wok or stir fry pan. Don’t bother with a round-bottom unless you have a high end stove with a wok ring built in. For most people, a flat-bottom is best. Look for one with a nice weight. Cast iron conducts heat well, but it’s heavy and hard to move and pick up. Also cast iron isn’t ideal for stir frying because it isn’t responsive to heat changes; it holds heat a long time.

N: What’s the difference between an uncoated carbon steel wok and a non-stick wok?

Helen: The uncoated is carbon steel without any coating except perhaps oil or a clear lacquer to help the pan from getting rusty during the time it would sit on a store shelf.

Carbon steel must be seasoned. This sounds like it might make food taste better but it doesn’t, it just keeps the pan from rusting. Takes a good 6 months of almost daily use for a wok to get really seasoned. If you like to season, get carbon steel. If you don’t plan to use your wok more than 3x a week, the oil you use to season it will eventually get tacky, attract dust, and it may rust. When people see rust, they may think they need a new one. Nope! All you need to do is clean the rust off and re-season. In a Chinese kitchen the wok is used daily, and often sits on the burner just waiting for the next meal to be made in it, so seasoning is not a problem.  If you live near the ocean a carbon steel wok may rust more easily due to the high moisture content in the air.

A non-stick wok comes in many varieties. High end, inexpensive, Teflon or not, plus there is non-stick for different purposes. A skillet has a different nonstick coating than a cake pan or stir fry pan. In a stir fry pan, food is stirred, unlike a skillet where things might just be turned a few times. The nonstick coating must be strong. For stir frying we also tend to use a higher heat and the pan must be able to take a higher temperature. For the woks from Helen’s Asian Kitchen we use the Excalibur® process, developed by Whitford, known as reinforced nonstick and it can take higher temperatures.

N: What do you use at home?

Helen: The 14″ and 12″ non-stick woks from the Helen’s Asian Kitchen line, depending on the food volume that I’m preparing. When cooking for a dinner party, or using a high volume ingredient like noodles, I use the 14” but when cooking for myself I use the 12.” It’s about personal preference.  There’s nothing wrong with carbon steel as long as your know it needs extra care.

N: Helen, for those that choose a carbon steel wok, how would you suggest they season the wok?

Helen: Wash in warm soapy water and scrub to remove any coating or food safe lacquer.  Then use vegetable oil, corn oil, but not butter or olive oil. Heat the pan and add a few tablespoons of oil. Heat it until the oil smokes. Then remove from heat, wipe off excess oil and allow to cool. Repeat.

N: What type of wok is best for a home chef that’s just exploring using a wok for the first time? And what type is best for an experienced chef, looking to invest in a high quality wok?

Helen: I would recommend a high quality non-stick pan coated with a premium non-stick coating like Excalibur. It’s not that expensive, but performs well. If someone prefers to season a pan, then go with carbon steel.

N: How long should a cook expect to keep a well-cared-for wok?

Helen: The pan I started with 7 years ago I still use today. For a well-cared for wok, it should last many years. Don’t put it in the dishwasher and don’t use metal tools that would scratch it.

N: Is there any special recipe that you like to cook in a wok that might surprise?

Helen: I make Italian bolognese sauce in my wok but instead of beef I use turkey. I make a large batch in the 14” wok. I sauté the meat, and brown onions in it. I use the 12” for risotto and also use it for French sautéing. For dessert I make Almond Brittle it the 12” wok.  I hang it on my pot rack and it’s one of the top 2 pieces of cookware I use in my kitchen at home.

N: What’s something that you remember watching your mom make in a wok? And do you make that same dish today?

Helen: Anything stir fry.

To learn more about Helen Chen’s cookbooks and recipes, visit http://www.helensasiankitchen.com/
See the Helen’s Asian Kitchen kitchenware line at:  http://www.hickitchen.com/helen-chens-asian-kitchen.aspx
Where to buy? http://www.hickitchen.com/where-to-buy.aspx
Interested in meeting Helen?  See Helen Chen’s Cooking class schedule

*Not affiliated with Joyce Chen Products

Biography of Helen Chen

Helen Chen

Helen Chen

Helen Chen is a widely acknowledged expert in Chinese cooking. Besides her role as an educator and cookbook author, she also is a product and business consultant to the housewares industry. In 2007 she created and developed a new line of Asian kitchenware under the brand name, “Helen’s Asian Kitchen,” expressly for Harold Import Company in New Jersey.

Having been born in China, and raised and educated in the United States, Helen brings the best of both worlds to her approach to the art of Chinese cuisine. She understands the needs of the American cook as only a native can, yet she is intimately knowledgeable with the culinary practices and philosophy of China.

Helen is the author of Helen Chen’s Chinese Home Cooking (Hearst Books,1994), Peking Cuisine (Orion Books,1997), Helen’s Asian Kitchen: Easy Chinese Stir-Fries (John Wiley & Sons, 2009) and Helen’s Asian Kitchen: Easy Asian Noodles (John Wiley & Sons, 2010). For more information, visit http://www.helensasiankitchen.com/