Oven To Table Bakeware Filled with Sweet and Savory Delights
The kitchen can be a hectic place, which is why I always turn to my favorite tools and cookware to help me get through the process. A key part of my collection is finding multipurpose items that not only save on the space (I’ve a small kitchen), save on time (I’m crunched for time), and add a bit of style to meal service (Why not impress the family with presentation, too?)
When most of us think of multifunctional kitchenware, we think of those small appliances that come with a plug. I use my food processor for everything from chopping vegetables to making dough. I use my electric pressure cooker for sautéing veggies, pressure-cooking beans and for making soup. I use my slow cooker for roasts, casseroles, and keeping mulled wine at perfect temperature for a party. And my professional-grade blender serves up everything from smoothies to freshly ground spices.
But, beyond the multifunctional electric appliances, my kitchen is filled with a few essential pieces of cookware and bakeware. In particular, one of my favorites is my oven-to-table ware — a white, porcelain, fluted baker.
Yes, it’s a basic baker, no bells and whistles, but it’s utility outshines many of my high-end plugged-in tools in the kitchen. The reason is simple: It cooks just about everything, saves me time, and is pretty stylish too.
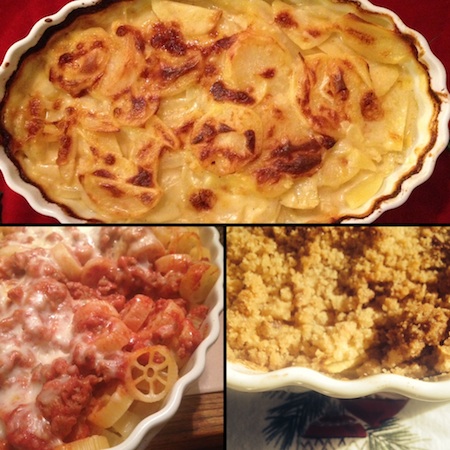
One of the main benefits of using oven-to-table ware is its utility. One dish goes from freezer to fridge, and from oven (or microwave) to the table. Perfect for use all year round, these pieces are particularly handy during the holiday season, and are ideal for everything from breakfast, lunch and dinner (Chicken Pot Pie), to appetizers, side dishes (Corn Bread, Wild Mushroom and Pecan Stuffing) and desserts (Parisian Apple Crisp).
My oven-to-table ware is perfect for hectic evenings, casual or formal parties, or for delicious appetizers for game-time. I often pre-make meals, and store them in the freezer until ready to use. If, by chance, there are leftovers, I slip the baker in the fridge, until we’re ready to eat again – when I reheat in the same piece, in either the oven or the microwave.
Another coveted benefit of using my oven-to-table ware is the idea of having fewer dishes to clean. One pot, from freezer to oven to table – is a welcomed choice especially in our home (we don’t have a dishwasher!) Made to last a lifetime, the porcelain oven to table bakers are easily cleaned by hand with soap and water, or in the dishwasher.
Oven-to-table ware comes in all shapes and sizes. It’s best to have several different sizes on hand – some can be single serve, others big enough for a party, and still others sized perfectly for those family one-pot meals.
As for styling, I opt for a classic white. Sure, matching patterned pieces are fun to have, but the classic white glaze with its decorative fluted edges takes me through the seasons, and looks great whenever, or wherever, I use it – from casual everyday occasions to the formal dinner parties.
Here is one of my favorite meals to make in my oven-to-table baker: (you can find HIC’s Oven-To-Table Fine Porcelain Fluted Baker here)
Polenta Pie
An easy deep-dish pizza with a thick and crunchy cornmeal crust. It takes a total of 1 ¼ hours to prepare, most of which is the crust-baking time. The recipe yields 1, 10-inch pie, which serves four. We like to substitute our favorite vegetables, or those we have currently available. Also, at times we skip the tomato slices and add a bit of tomato sauce instead.
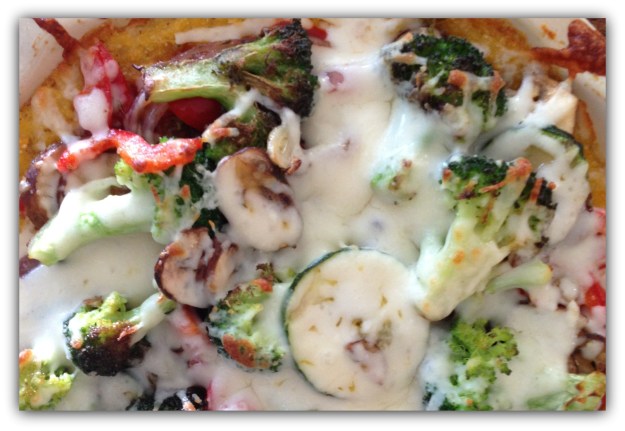
Polenta Pie in Oven to Table Bakeware from HIC
Crust:
- 1 ½ cups coarse cornmeal
- 1 tsp salt
- 1 ½ cups cold water
- 2 cups boiling water
- a little olive oil
Filling:
- 1 tbsp olive oil
- 1 small onion, thinly sliced
- ½ cup thinly sliced bell pepper
- about 10 mushrooms, sliced
- 1 small zucchini, thinly sliced
- 5-6 medium cloves garlic, sliced
- 2 tsp dried basil (or 2Tbsp minced fresh basil)
- ½ tsp oregano
- fresh black pepper
- ¼ lb. mozzarella cheese, grated
- 2 small – or 1 medium – ripe tomato(es), sliced
Combine cornmeal, salt, and cold water in a small bowl. Have the boiling water on the stove in a saucepan, and add the cornmeal mixture, whisking. Cook about 10 minutes over low heat, stirring frequently. It will get very thick. Remove from heat, and let cool until it can be handled.
Preheat oven to 275 degrees F. Oil a 10-inch pie pan or baker. Add the polenta, and use a spatula and wet hands to form it into a smooth, thick crust over the bottom and the sides of the pan. Brush the surface with olive oil, and bake uncovered for 45 minutes.
While the crust bakes, heat 1 tbsp olive oil in a medium-sized skillet. Add the onion, and sauté for 5-8 minutes, or until it begins to soften. Add bell pepper, mushrooms, and zucchini, and sauté until everything is tender. Stir in the garlic and herbs, and sauté just a few minutes more.
Turn up the oven to broiling temperature. Sprinkle half the cheese onto the bottom of the baked crust, then add the tomato slices. Spread the sautéed mixture over the tomatoes, and sprinkle the remaining cheese on top. Broil until brown (about 5 minutes), and serve hot.
Source: The New Moosewood Cookbook by Mollie Katzen
Laura Everage is a writer, editor, swimmer, yoga-lover, wife, and mother of four. Her days start very early in the morning, but thanks to her favorite beverage, coffee, she is able to start each day on a good note. Laura began her journey in all things food and beverage related nearly 20 years ago, as Managing Editor of The Gourmet Retailer. She continues to write about food, coffee, tea and kitchenware and is currently working on a book entitled Courage in a Cup: Women, Coffee and the Global Economy. Laura is also founder and editor of her own website, Family Eats, and is editorial director/partner of Coffee Universe.Her work has appeared in a variety of trade magazines as well as consumer publications Saveur and Consumers’ Digest. Laura’s knowledge of the industry has landed her appearances on both the Food Network and Fine Living Network. To contact Laura, email Laura@familyeats.net.